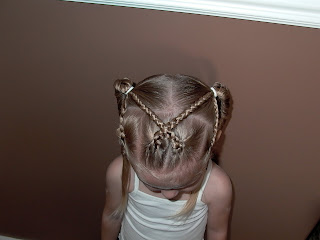
This is the top view of what we did today.
I started with damp hair. I always say to use just wet hair, because I don't love putting a lot of product on my girls' hair, BUT, I neglected to mention that using a small amount of lightweight gel at this stage, when the hair will all be braided, or done tightly, can be handy in keeping the hair smooth, especially in little braids. I didn't use gel on this style, but it might have held the fish tails in better for longer. You'll need 6 elastics, and maybe a clip.
First I made a center part; you'll only need to go as far back as her ears.
This shows the part farther back than you'll need to go.
Here you can see I only went to the ears, and then combed the rest of the hair back. Part off each side in equal sections, leaving room for four braids in the front.
To begin braid, comb hair forward toward face, and begin braid close to front. Since this only reaches to pony, I wanted to have more braid showing, rather than starting at the back or middle of section.
I like braiding backwards, or inside out--just my preference. You only need to braid just past where your back pony will be. Do 3 more braids in even sections in the front.
Next step is to part the back evenly into ponys. This is how I do it to get it even each time. Position comb in middle of her head on top (that's my daughter's hand holding the comb for me, my right one didn't shrink-- I had to hold the camera),
and with my left hand (or whichever) I place my thumb in the little dent in her neck, which is the middle of her head, (I lifted her hair to show you),
then bring the comb straight down to your thumb. Now here's where I ended up with missing pictures. They only showed how after this point, I comb the two sides away from each other, and spray with water, to keep them separate. You can clip off the other section, but that's just one more step to me, since I want it wet anyway. This way you can make sure your part is straight before you put it in ponys.
Next, after you part, comb hair up to high pony on one side, and take the bottom front braid on that side, and skip one, and take the next, so it looks like this. Lay braids flat and put in elastic. After you get the loose hair and braids secure, take out the small braids.
To start fish tail, comb hair and spray well. Divide into two equal sections.
Begin by taking small section of hair from right side, and bringing it across.
Repeat on other side. Each time you pick up a new piece, just incorporate into the new side--you don't have to keep the sections apart like in a reg. braid. Just make sure to try and get your new small pieces equal in size.
The trick with fish tails is to keep them tight, and the pieces even . I use my thumb in the middle to keep it pinched tightly.
Make sure to draw your pieces from the top of the underside hair, as I'm trying to show here.
This does take some time, so you can end the braid wherever you think it will look alright. I left her 3 or 4 inches on the end.
Back view. Spray tops and bottoms of braids with hairspray.
Front view. She's looking over at the TV, because Max and Ruby came on. In case you couldn't tell, I park my girls in front of the tv to do their hair, and they are infinitely more cooperative and happy. Having a snack doesn't hurt either.


