Showing posts with label braid. Show all posts

Monday, 21 November 2011

How to use a Flexi-Clip Hair Clip Video Tutorial

This is a GREAT little hair accessory that I received as a gift from Sarah Montee, an independent Lilla Rose consultant, and my gals and I love it! It's called a Flexi-Clip, and it's a new and improved version of the good old chopsticks style hair pins. And the best news about one of these is, you could win one of your own! We'll be giving away a gift certificate to the Flexi-Clip website. Details in my next post........

So first, check out how great, cute, and easy these hair clips are!
Here's some pics of some of the hairdo's we've tried:

Tails Up:
 This pic shows how we used a ponytail first to secure her slippery hair.
Tails In:

Check out the video and don't forget to subscribe to my YouTube Channel to see all my Video Tutorials! (see button above!)


Wednesday, 13 July 2011

How to do little girl's hairstyles: Amanda Seyfried "Letters to Juliet" Hairstyle Video Tutorial

I've been asked several times to show how to do this particular hairstyle. After watching the bit of movie in which this hairstyle is showcased about 50 times, here's what I've come up with. It's easier with long hair (in fact long hair is a must for this-either your own or some of those clip in extensions). Either way-hope you enjoy it! Also, my gal had this in her hair all day long and it stayed in--bobby pins and all!

Amanda Seyfriend "Letters to Juliet"-balcony scene hairdo:


Wednesday, 15 June 2011

Little Girl's Hairstyles: How to do a French Rope Braid Video Tutorial

Well, I'm sure some of you have just given up hope that I would EVER return to the world of hairdo-blogging. I wondered at times as well! BUT, I am here, and on the road to normal life! My baby is sleeping through the night, and the fog has lifted, and I even am exercising (okay, only 3 times so far in two months), and life is GOOD!

This video was done actually before I had my little one, but the editing and getting it off my camera business seems to take more time than the actual hairdo. I found this hairstyle in a book one day, and it looked intriguing, so here we go. It's the getting the hands in the right places on this one that's the challenge, but it really is pretty and different! I'd love to hear what you think when you try it!

French Rope Braid

Monday, 18 April 2011

Little Girl's Hairstyles: Easy Twist Around Braided Ponytail 10-15 min

Well, here's a funny thing: I could have sworn I'd already posted this hairdo! Am I crazy? Does this look familiar to any of you? I searched and searched, and could not find it anywhere! If anyone of you find it elsewhere, please let me know! If not, then here's a new one for you! I was going to use this as one of my 'Blast from the Past' hairdos, since I happened upon the pictures and was reminded of how much I liked this hairstyle, but ........a new hairstyle is great too!

Twist Around Braided Ponytail

 This side view shows off the back ponytail nicely. I started this cute little hairdo with a french braid in front, drawing in hair, just to the ears. I then finished the braid all the way down to the ends.  I then gathered the rest of the hair (nice and damp of course) up to where I finished the actual french braid, and put it, along with the braid, into a high ponytail.

 I then just twisted the remainder of her loose hair and wrapped it around the braid, and secured the ends with an elastic. Keeping the hair damp, especially in the twist, will help keep the hairdo in longer and looking more finished. Spray both sides of the finished braid well with hairspray, and she's done!
 Those cute bows and smiles finish it off nicely!


Monday, 4 April 2011

Little Girl's Hairstyles: Off centered braid and twist hairstyle 15-20 min

Happy April! This is my favorite time of year! All my bulbs are coming up (along with the weeds), but I just love watching everything start to blossom and turn green again, rather than the drab brown patches I've been looking at all winter! So in preparation for the Easter holiday, here's a little 'series' I'll be sharing in the next few posts:

This is a 'progressive' hairstyle, I like to call it, because I use the first part of this hairstyle, with the off-centered french braid and twist in a few different hairstyles--which I build on, to give you more ideas and variety.  This hairstyle has a french braid, a twist, a twist braid, a stacked pony, and a regular braided ponytail-but it's still easy and basic! Like most of my 'basic' components, I have videos on how to do them. Feel free to check those out for the french braid and the twist braid if needs be in the Video Tutorial section.

 To begin, I started with, of course!, DAMP hair. This is pretty much the case with about 99% of my hairdos. I give her a center part, back to the ear line.
 I then part down to her ear on the larger side. This is where I will be doing the french braid.
 I french braid back to the part, and then continue with a regular braid, just far enough to reach a little past the center of her head in the back.

 Then on to the smaller parted section.
 Comb neatly and begin twisting towards the center of her head.
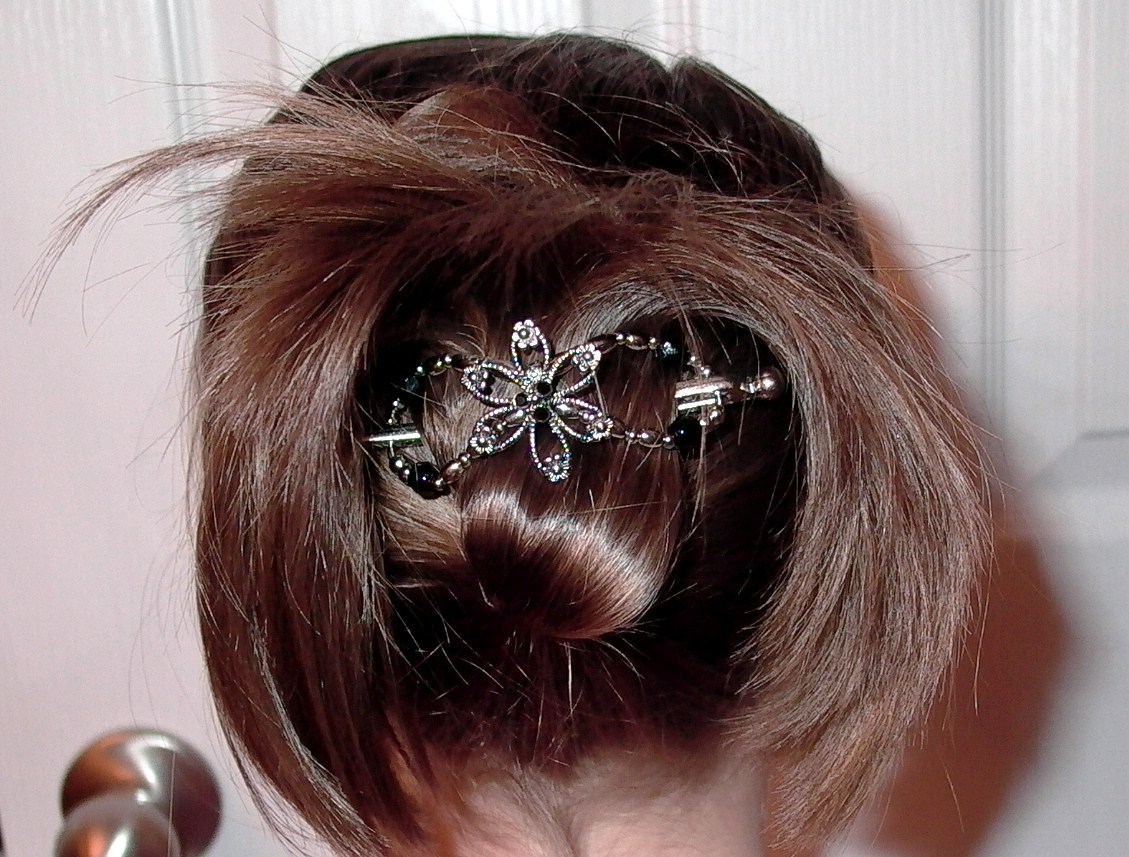
 Join them off-centered like so, with an elastic.This is my stopping point for the other hairstyles I'll be showing you soon.
 From this point, I do a twist braid down to the ends of her hair
 And then secure the rest of the hair into a low ponytail.
 I pull the ponytail over the top of the joined braid and twist,
 and make a stacked pony and wrap the twist braid around base of the ponytail. I use a clear elastic to secure the twist braid in place. I then braid the ponytail down to the ends. If your daughter's hair isn't long enough to do the twist braid, just wrap it around the ponytail base.


 You'll need to plan a few extra minutes if you want to do all the twists and braids, but it's a fun one to do! I really like the off-centered look of the ponytail when she's all done.

Thursday, 31 March 2011

Little Girl's Hairstyles: Cute and easy braid hairdo 7-10 min

This is a simple little braided hairdo that I really didn't think was super duper much of much--but I got (or SHE got) so many compliments on it, I thought I'd share it! As always, my mantra is : The easier and faster the hairstyle is, (and all the while still being cute), the MORE I like it!

Here's the finished look:
I split the front of her hair, from forehead back to the ear line, straight down the center, and centered two ponytails up top. (Of course her hair was thoroughly damp). I then combed it all down to the midpoint of her head, from ear to ear, parted off the underneath hair, and secured it with a center ponytail.
 I then split that one ponytail, along with the remaining hair underneath in half again, prepping for the two braids. I began the braids closer to the center part, so they wouldn't hang over her shoulders (her preference), and did two tight backwards braids (my preference) down to the ends. When braiding I spray the hair with water often, to help keep the braids in longer and smooth down flyaways, or shorter hairs.

I put in this darling korker bow in the centered ponytail in back, and she was all finished. If your daughter's hair isn't long enough for the braids, then put the hair in ponytails or little stuffed or messy buns.

 2 more weeks friends!! I have some videos saved up for my 'hiatus' away from all normality-so don't be strangers!


Wednesday, 22 December 2010

How to do girl's hairstyles: Low Side French Braids into braided ponytail 15-20 min

So Christmas is right around the corner!! We just got a whole ton of snow, and my girls' have been out playing and attempting to build a snowman this afternoon. There's nothing better and more magical than a beautiful white blanket on everything outside. That is, until you have to go out and drive in it or shovel it off your driveway, right! Even still, I love seeing how pristine and clean the snow makes everything look. It just seems fitting for this special season and holiday. So what I'm saying is, I'm grateful for the snow! I am also looking forward to not having to send off my kids to school or dance or anywhere else for a few weeks and just have the chance to hang out and have fun!
Did I mention we are expecting girl no. 3 this spring!? I gotta get some good one on one time with my girls now before Mom is totally swept up in baby! We are so excited to have another little princess and of course, more hair to do!
So, on that note--here's another little hairdo to try out. I must really be in the pioneer-type-hairdo mood lately, as this is another one that reminds me of young girls from that era. I just think it's a refreshing change to see little girls look like little girls, rather than putting grown up hair on them. Who needs them to grow up any faster than they already do?

Low Side French Braids

 I started with a center part, dampened hair, and began my regular french braid down low and close to the ears.

 I continued them all the way to the back of her head.
 And same on the other side.


 This is where it can get tricky. After finishing both braids, I took out both elastics holding the braids, smoothing the hair so both braids were hanging straight down in my one hand. I tried to meld the hair together into one bunch, without losing any of the braiding, so I could begin a fresh braid.
 Once I did that, I just finished off with a backwards braid all the way to the ends.


 Tie it off with a ribbon (I like mine up higher, rather than at the ends..they seem to stay in better for me there) and smile!
 Here's wishing all you wonderful moms and your families a wonderful Christmas! Enjoy those magical moments with the little ones. I've made a goal to NOT let messes get me in a dither and to just take a deep breath and ENJOY myself. They'll only be these ages once! Merry Christmas!