Showing posts with label 7-10 min. Show all posts

Friday, 7 October 2011

How to do Girl's Hair: Hair Rosette Headband Hairstyle Video Tutorial

A cute easy and FAST hairdo for those fellow moms who have more than one girl's head of hair to do before school! My little blondie started Kindergarten this year, and holy smokes do I have to be on top of it to get them both ready in a short amount of time. I've opted for the "one fancy, one quick" hairdoing, and then we rotate. My girls could care less which one they are in the morning, it's more to appease mom!

These are pics from a previous post. As you can see in this video, the placement doesn't always turn out perfect! I apologize--it's just indicative of my life right now: I have X amount of minutes to accomplish something (ex: the hair video) and I just have to do the best I can in those allotted minutes and take what I can get! My sweet baby really dictates my schedule, as you can hear her voicing her commands! Enjoy!

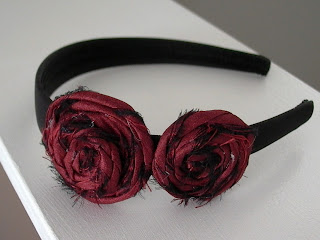
Hair Rosette Headband Hairdo:

To view my video on how to make your own headband like this, go here: Rosette Headband.

The ideal hairstyle


The main difference between my video and the above pics are the placements of the ponytails. You can see I didn't pull all of her hair in the front into ponytails, but just the hair from where it matches up with her eye and over. DO THIS, if you want your rosettes closer together. Do what I show on the video if you want all the front hair pulled up. Both are good--just depends on what look you prefer.


Happy Hairdoing!

Thursday, 31 March 2011

Little Girl's Hairstyles: Cute and easy braid hairdo 7-10 min

This is a simple little braided hairdo that I really didn't think was super duper much of much--but I got (or SHE got) so many compliments on it, I thought I'd share it! As always, my mantra is : The easier and faster the hairstyle is, (and all the while still being cute), the MORE I like it!

Here's the finished look:
I split the front of her hair, from forehead back to the ear line, straight down the center, and centered two ponytails up top. (Of course her hair was thoroughly damp). I then combed it all down to the midpoint of her head, from ear to ear, parted off the underneath hair, and secured it with a center ponytail.
 I then split that one ponytail, along with the remaining hair underneath in half again, prepping for the two braids. I began the braids closer to the center part, so they wouldn't hang over her shoulders (her preference), and did two tight backwards braids (my preference) down to the ends. When braiding I spray the hair with water often, to help keep the braids in longer and smooth down flyaways, or shorter hairs.

I put in this darling korker bow in the centered ponytail in back, and she was all finished. If your daughter's hair isn't long enough for the braids, then put the hair in ponytails or little stuffed or messy buns.

 2 more weeks friends!! I have some videos saved up for my 'hiatus' away from all normality-so don't be strangers!


Tuesday, 22 February 2011

Little Girl's Hairstyles: Short Hair Do- French Twist Braid into Ponytail 7-10 Min

Happy Tuesday ladies! Did anyone accomplish anything fantastic over the 3 day weekend? We made a 'start' on our baby's room. I have a love/hate relationship with home projects. I love them when they are done and how they make my house look, but I really detest the finishing of them. Nothing ever gets done in one day, right!?
Well, onto the hair: Since chopping off my older gal's hair, I thought I'd try to just chronicle some of the things we do each day on her new length. I have found it's MUCH easier to do hers, than the mega-lengths of my other daughter's hair (makes cutting it oh so tempting....), and faster!
Here's a cute one we did not too long ago: A simple French Twist Braid right in the middle of her head, and gathered back into a ponytail.

I just parted off the middle section of her hair, from forehead to line behind her ears, combed down the rest of the hair, and did a French Twist Braid. I continued the twist after I stopped gathering up hair from her head, down to the ends, and then combed everything back (with damp hair), into a single ponytail in the back.


 Pop in a cute flower, and she's ready for school!
 You can try to get your top section a TAD more in the center......but at that hour of the morning, I'm just glad to have her hair IN and DONE. Big kiss, and bye bye!


Thursday, 17 February 2011

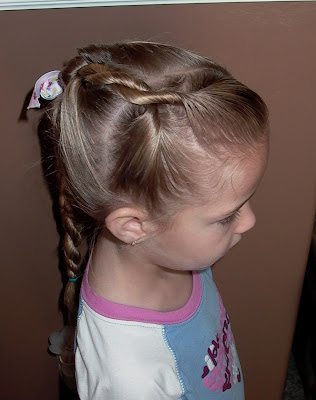
Little Girl's Hairstyles: Progressive Twist Braid: 7-10 min

Oh it's so good to be back! I guess you just don't appreciate what you have until it's gone, right? I thought things about blogger were a pain.......but that's only until I tried doing the same things (with my super UN-tecchy expertise) in a different format. This is probably so humorous to most of you who can do all this stuff with ease, but really, for some of us, it's a major struggle! Ah well, thankfully we are back (feels like home) and we can get on with the hair! Thanks for the patience!

Here's another easy and simple hairdo for your little girl that will work great on school mornings. It would probably need at least close to shoulder length hair to stay in well, but it can work on slightly shorter hair as well.
Start with damp hair, and do an angle part from the forehead to back behind the opposite ear.
 Divide that section in half, on the side you parted off, and prepare to do a twist braid.
 Do a twist braid to the ends of the hair, and secure with an elastic.
Next part off the second section of hair, going from the far side, behind the ear, to the other ear. Divide in half, prepping for another twist braid.
 Take the first twist braid, and wrap it with right section of your second twist braid, as pictured.
 Continue with the twist braid.
 Finish down to the ends again, and secure with elastic.
 Gather the rest of the hair, divide, and repeat what you did with the second twist braid, adding it in again. Twist braid down to the ends of the hair.
 Finished side.

 I like to put a bow or flower at the base of her neck, when she's sporting a long braid. It's just where it stays in, and doesn't catch on anything while swinging around.
We don't know what prompted the ill at ease face......but it's ok, we are still happy with how the hairdo turned out!
 Happy Blogging to all of you!


Monday, 3 January 2011

How to do girl's hairstyles: Triple Twist Braid Ponytails 7-10 min

A fast easy hairdo for those little gals who just beg for "just a ponytail, puh-leeze!?", like my little gal does EVERY day.

I parted off her hair straight down the middle to begin with (and of course, the hair is damp). I clipped off one side, and then parted off one side into two ponytails, in the middle of her head. Repeat on the other side.
 I kept all the hair from one outside ponytails, and divided the inside pony next to it in half, and did a twist braid. Next, join the inside halves of the middle two ponys and do twist braid no. 2.
 Finish with twist braid no. 3 using the other side in the same manner, to end up with 3 total twists braids. I spray the tops and undersides of my braids with hairspray, and they are out the bathroom door!

Monday, 25 October 2010

How to do girl's hairstyles : How to do a Rapunzel hairdo for Halloween 7-10 min

It's Rapunzel!

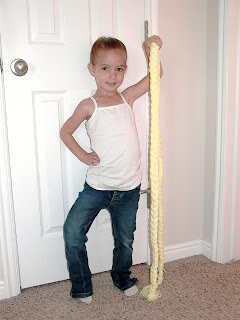
My little gal wants to be Rapunzel for Halloween, and although she has long hair, it's not nearly long enough for Rapunzel! We had to be a little creative for her hair, and I thought I'd share it with you....in case any of your princesses want to be the same. It's an easy cheap costume and turned out pretty darn cute! Here's the  final outfit:
For Rapunzel's hair, I first braided her own hair back into a high pony, and then braided her ponytail.
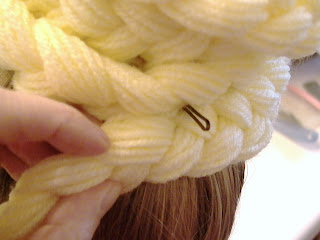
 I then wrapped the braid around itself, and bobby pinned it in.
 Use as many as you need to secure it well.
 I purchased some yarn that was close (compared to the other colors!) to her hair color (this is what was left after we made the braid).
 We made a braid out of the yarn that was about twice as tall as she was. To get that approximate length, I cut about 50 strands (to make it nice and thick) about 9 feet in length, or 3x her height. My finished braid was about 2/3 of that. I wanted enough to wrap around her head, and then hang down.
 To secure the braid, I wrapped one end of the braid under her already wrapped braid, and bobby pinned it in.
I then wrapped it about 4 times (or until you get the right amount left that you want to hang down), bobby pinning as I went.
 When I got it to where I wanted it to go over her shoulder, I bobby pinned it like so, in the back middle of the bun.
 I used 2-3 bobby pins to keep it in tight.
 She put on one of her dress-ups and voila! Rapunzel!


We'll add in some jewelry and of course some makeup (her favorite part of Halloween) come parties and trick or treating this week, but I was pleased with the results!
Happy costume making!
Wednesday, 20 October 2010

How to do girl's hairstyles : How to do a Side Braid Flip 7-10 min

Hi Ladies! Here's a little hairdo I saw on a little gal not too long ago, and just thought it was great, not only because it was adorable, but most importantly, you could do it in a reasonable amount of time! Please forgive the grumpy face we have pictured here. We are a real life family, full of grumps and bumps, and it was one of those mornings. She did consent to pictures, although with a sigh and a "Oooooooookay!" Bless her little grumpy heart.

To start, I combed wet hair over to a side ponytail, with a side front part, and put the ponytail back behind the ear.
I then split her ponytail in half, and braided both sides, down the ends.
I then brought the braid ends up to the ponytail, ends out.
I took a clear elastic and wrapped it around to secure the braided ends. Don't mind me trying to take a picture while keeping my fingers in the elastic, for the sake of showing you what I was trying to do. The circulation did return, thankfully.:)
I finished it off with a cute little flower, sticking the clip down inside the elastic, and sprayed it well with hairspray. I also sprayed the ends and tried to fan them out around the flower, so they don't look straggly. You can also curl them real quick with an iron if they need some extra help, or pin them back using even the bow clip.
And we got a smile by the end........