Showing posts with label short hair. Show all posts

Thursday, 24 March 2011

Little Girl's Hairstyles: Short Hairdo! Double Stuffed Buns 5-7 Min

I am trying to get a few more 'short hairdos' on here for you gals, since my oldest's hair is a more common length now. I really do enjoy doing her hair a teensy bit more, probably since it's just LESS to comb out, and it really does take less time. But hey, I've wanted waist length hair my whole young life, and never quite got it, and it is just too much fun to whack off my youngest daughter's hair. Fun, but MORE work!
So anyway, I'm just enjoy the variety!
This is a before school short hairdo we did, a variation on my Mohawk I shared a while ago. Stuffed buns ARE easier and faster as well with this length--just about perfect in fact.
I just parted her hair basically in half, thoroughly dampened it, and centered the stuffed buns on top and in the back.
 Super cute!
Hope this is a winner for those shorter hair lengths! Have a great weekend! Yet another dance competition for us, 3 1/2 hrs away, and me being almost 37 weeks pregnant. Guess why it's a must I go? To do the hair, ladies.......
Have a great one!

Friday, 18 March 2011

Little Girl's Hairstyles: Mini French Braids 10-15 Min

How did all the St. Paddy's day hairdos turn out? I saw some really cute ones when we were out and about that day. After a playdate on the play place at Carl's Jr., preschool, jumping on the tramp, and then a birthday party that evening, our shamrock hairdos were looking a little sad--but then, what hairdo would still look good after all of that? The gals got to play!

This was a quick hairdo before preschool one day, that I had grand designs for, but an impatient child stopped those before they got too far along. I was still happy with the result, and so was she (since she loves ANY hairstyle that leaves her hair DOWN). And I apologize I don't have a picture from the top down that shows both sides of the french braids, but, again, trying to get her out the door, and keeping her happy at the same time!


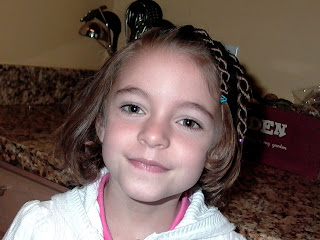
 I started this french braid hairstyle with an angle part (going from a side part beginning and going diagonal across the top of her head).
 I parted off on the larger side, down to her ear, prepping for the first french braid.
 I did a french braid a few inches long, secured with an elastic, and parted off my next french braid section, keeping it equal to the first.
I repeated this one more more time, making three mini french braids on this side.
 On the opposite side, I did two more mini french braids (I did use a backwards/dutch braids on mine, but do whatever is best for you).
 If you have the time and oomph, flat iron or curl the rest of her hair, if needs be. Or just keep her smiling and say, "Hey, we are done!"


 Happy Weekend Gals! We are off to dance competitions tomorrow, and more fun home painting projects (the nesting is really kicking in--my wonderful hubby is being kept BUSY!)


Tuesday, 15 March 2011

Little Girl's Hairstyles: St. Patrick's Hairdo: The Shamrock Hairdo 10-15 min

The Shamrock Hairdo

I've been browsing some other hair blogs to see their takes on the 'clover' (because, really, what else can you do for St. Paddy's? A leprechaun perched on their head?), and all the hairstyles were frankly just too complex for me! Perhaps because I'm pregnant, or lazy, or the combo of the two, so I had to do something a little easier and faster (they were all super cute--but just TOO much work for me!). You can do this with whatever kind of braid you are in the mood for. I opt for a twist braid because it's FAST!

First, I start with thoroughly dampened hair, and comb it all back into a mid-height ponytail.
 Then since I was going only for a 3 leaf clover, I did three twist braids. You can see my video on twist braids to learn how to do them if necessary. I did one twist braid from the top portion of the ponytail, and then split the underneath into two sections.
 I then made a 'stem' by ponytailing off a low section. Where you put this secondary elastic will depend on the length of your braids. I did my other daughter's hair, which is much shorter, and so her 'stem' is much shorter as well.
 I then brought the 'stem' portion up to the middle or base of the ponytail like pictured, and then laid the twist braids out like the leaves of the clover.
 I then used bobby pins to hold them in place. You may want to crisscross two where I show this one.
 Pin all three (or four if you want a 4 leaf) in place well.
 Then I stuck two bobby pins down through the base of the ponytail and the top part of the stem to hold it in place.

 I added a green bow at the top of the stem.

 Now for the short hair version: My older daughter's hair just touches the tops of her shoulders. Here's her twist braids pinned up into the leaf sections. Notice how short her 'stem' is. I bobby pinned these braids to each other, rather than to her head, and then down through the base of the ponytail again. I liked how they stood up!


 I may want to trim this ribbon before I use it again.....but it's all ok!


A Irish Wish for a Friend


Wishing you a rainbow
For sunlight after showers—
Miles and miles of Irish smiles
For golden happy hours—
Shamrocks at your doorway
For luck and laughter too,
And a host of friends that never ends
Each day your whole life through!

Happy St. Patrick's Day to you!

Tuesday, 22 February 2011

Little Girl's Hairstyles: Short Hair Do- French Twist Braid into Ponytail 7-10 Min

Happy Tuesday ladies! Did anyone accomplish anything fantastic over the 3 day weekend? We made a 'start' on our baby's room. I have a love/hate relationship with home projects. I love them when they are done and how they make my house look, but I really detest the finishing of them. Nothing ever gets done in one day, right!?
Well, onto the hair: Since chopping off my older gal's hair, I thought I'd try to just chronicle some of the things we do each day on her new length. I have found it's MUCH easier to do hers, than the mega-lengths of my other daughter's hair (makes cutting it oh so tempting....), and faster!
Here's a cute one we did not too long ago: A simple French Twist Braid right in the middle of her head, and gathered back into a ponytail.

I just parted off the middle section of her hair, from forehead to line behind her ears, combed down the rest of the hair, and did a French Twist Braid. I continued the twist after I stopped gathering up hair from her head, down to the ends, and then combed everything back (with damp hair), into a single ponytail in the back.


 Pop in a cute flower, and she's ready for school!
 You can try to get your top section a TAD more in the center......but at that hour of the morning, I'm just glad to have her hair IN and DONE. Big kiss, and bye bye!


Wednesday, 5 January 2011

Little Girl's Hairstyles - LOOK what we did!! Triple Twist Braids 5-7 min

Well, just look what we did:
 If it's not immediately obvious, we cut off about 10 inches off my oldest daughter's hair! This actually did happen a while ago.....since this picture of her was taken in her Halloween costume (ha ha), and I've just been slow at getting it up here. It has been FUN having a gal with a head of short hair (and FASTER thank goodness). We've had a good time coming up with different ideas to do with her now short bob. So here's one of first samplings:

Hanging Triple Twist Braids:

I initially parted off her hair on one side (first a side part), and then back to her ears. I then sectioned that part into three sections, as you can see here, diagonal partings. I then did small (much smaller than I'm used to!) twist braids in the middle of each section.
 I then did some corkscrew curls in the back with my 1/2 inch curling iron, and finger combed them after.
 I think she's darling! It's given us a whole new sense of fun when it comes to hairdoing time! It's been interesting to experiment with hair this length--and find out that yes, ponytails are still possible! I'd love your greatest ideas on this length of hair!
Hurray for short hair!

Friday, 3 December 2010

How to do girl's hairstyles: A puffy braid into stuffed buns 10-15 min

I love these puffy braids, done low and just along the hairline next to the ears. Nothing too fancy, but just a little bit different!
I parted her hair into a side part in the front, then zagged over for a center part to go down the back. 
 Next I started parting off into the sections for the puffy braids. I did pull through's on the ponytails to give it some interest. I tried keeping it next to the edge of her hairline. I think it gives it more of an 'antique' look, like something from Little House on the Prairie.
 I traveled the puffy braid down to the nape of her neck on both sides.
And I ended the ponytails in stuffed buns. See my video on how to do stuffed buns here.
 Finished look


This is a great one for short hair too!

Friday, 19 November 2010

How to do girl's hairstyles: November's Creative Genius!!

This month's Creative Genius is Karli, who has her own blog, Curly Hairdo Ideas. She has super duper cute curly hair to work with, and has some great tips on keeping those locks healthy and happy. I liked this one a lot because I have so many of you ask for good tips on SHORT hairdos, and thought this would be a super one to throw in the mix.
Thanks Karli, for sending these instructions and darling pics!

Curly Do by Karli:

To get this look we started with completely detangled curls (To detangle curls  - wet the hair, use a little leave in conditioner if desired, detangle gently with fingers first, then wide tooth comb if needed, start at the ends and work toward the roots, small sections at a time!)  then sectioned out a triangular piece in the "bangs" area near her forehead. Note that the triangle gives you something to anchor to later...
I gently, lightly twisted that hair to make a poof! I used two bobby pins to secure the hair.  (Note that the triangle you made earlier gives you something to anchor to now.)
Next, take up a section of hair from the ear up toward the area you've been working, divide it in two pieces. Twist them both individually to the right, then twist them around each other to the left and you'll end up with this...
Do the same on the other side.

Secure them with bobby pins! (I like the small ones - they seem to hold well and are better sized for little heads!) Also, if you cross the bobby pins, they sort of lock together and stay put better.
Then fluff the tails of the hair you've been working with and add a bow and you are Done! Quick, easy, unique and totally stylish! :D lol!
Her curls are the cutest! I love the little twist braid as well, peeping out of those curls. Happy November!