This is a two part process, each part taking about 7-10 min. I do this alot the night before church, and it really saves me on time, but they look fancy for church!
These are the curlers I used, about 1 inch curlers. They have all sizes, so you can use what you think will work best for the length you'll use them on. I like the foam because they are more comfortable to sleep in. I used about 10 curlers for her hair, but normally I use 12 (but somehow two were MIA until I was all done).
Start with dry hair--since I do this at night, and right after bath time, I have to dry their hair beforehand. When parting off sections for the curlers, part and roll in the direction the hair will lay after you take them out. Since I part her hair on the side usually, this is where I first part it, then work out from there. I only finger comb out the curls, so if I have the hair rolled in an odd direction, I can't do much to make it lay otherwise the next day. Hopefully you'll see what I mean as I go on.
First section: This curler will be rolled under, and it will lay to the left, since that's how her part is.
I prefer rolling under, since any stray hairs will lay under, rather than up. The hair on the top of the head I first comb straight up, then place the curler where the first ends start showing up.
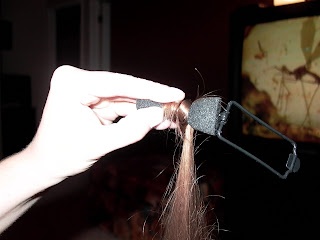
I then wrap the ends around the curler, and hold the very tips down with my thumb. This is when I start rolling, tucking those little ends under as I roll.
Smooth the ends in as you go, starting to angle the curler and wrap the hair like the pictures show. You continue from side to side, roll down to one side, then tilt to the other and roll in that direction. This helps the wrapped hair stay in tighter and more evenly.
And this is about where I finish on the piece. I like to leave a few inches of 'wiggle room', instead of rolled up next to her head. Since she'll be sleeping in the curlers, having it away from the head makes it more comfortable...and then she'll let me do it again.
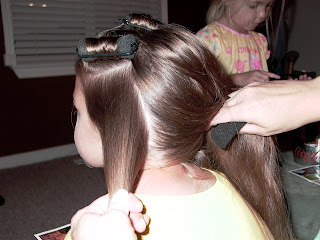
I do two curlers down that side (her left) of the head, both laying this direction (north/south?). Also, see how the hair is combed down instead of up on this bottom piece? This will let you roll in the underneath pieces of her hair easily.
Wrapping around, holding hair directing down.
Starting back section--notice the direction I am now rolling the hair (east/west?). And the hair is not combed up or down, but straight out from the head.
Put as much hair in the curler as needed. The more curlers you have (and the smaller they are) the tighter the curls. It all depends on the length and thickness. Her hair is not super thick, but it's longer, so these section sizes seem to work well. Also, if their hair has more body, the curls will grab more and hold throughout the day. If the hair is very straight, you might want more curlers. It all depends on what you want the finished look to be.
All rolled. Notice how the first curler on top in the back is not parted on one half, but centered. This will make the hair lay nice when taken out and not part to two sides. I followed that pattern straight down her head. (The curler just to the right of the top section is rolled the east/west direction, but just laying to the side.)
The next morning, right after I took out the rollers. Just unroll the curlers, avoiding pulling on the hair.
After I finger comb through the curls. This gives you an idea of how curly it is from what I used, and how the partings from the curlers don't split her hair in the back. Her hair is a little wavy on its own, so it comes out tight like this at first. By the end of the day, the curls are much looser and softer. This is where I spray the curls lightly with an aerosol hairspray.
Usually when I do curlers, I just pull back a small section of hair in the front, and clip in a bow to make it quick. BUT...I thought I'd do something else here, since the camera was out. I parted the front into three sections, this one on the smaller side of her normal part. I sprayed it with hairspray and combed the first 4-5 inches up from her head, (not the curly ends-don't use a comb on those), to make it lay flat and smooth.
I began twisting, while pulling the hair toward her face, to make the base of the twist closer to her face.
Then I pulled the twist back, kind of wrapping around the base, and then securing with a bobby pin or clip.
Finished twists.
I joined the twists into one pony.
They need to be anchored to the head at this point, so I used a flower barrette, grabbing hair from underneath the pony to secure it.
Finished back
And front view. I wish I had taken a pic when she came home from school this day. The flower was gone, the twist pony was laying to the side, and partly in her face, and her curls were much looser. That's what happens on the playground!


