Showing posts with label 10-15 min. Show all posts

Monday, 18 April 2011

Little Girl's Hairstyles: Easy Twist Around Braided Ponytail 10-15 min

Well, here's a funny thing: I could have sworn I'd already posted this hairdo! Am I crazy? Does this look familiar to any of you? I searched and searched, and could not find it anywhere! If anyone of you find it elsewhere, please let me know! If not, then here's a new one for you! I was going to use this as one of my 'Blast from the Past' hairdos, since I happened upon the pictures and was reminded of how much I liked this hairstyle, but ........a new hairstyle is great too!

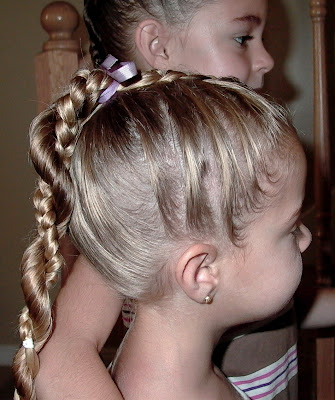
Twist Around Braided Ponytail

 This side view shows off the back ponytail nicely. I started this cute little hairdo with a french braid in front, drawing in hair, just to the ears. I then finished the braid all the way down to the ends.  I then gathered the rest of the hair (nice and damp of course) up to where I finished the actual french braid, and put it, along with the braid, into a high ponytail.

 I then just twisted the remainder of her loose hair and wrapped it around the braid, and secured the ends with an elastic. Keeping the hair damp, especially in the twist, will help keep the hairdo in longer and looking more finished. Spray both sides of the finished braid well with hairspray, and she's done!
 Those cute bows and smiles finish it off nicely!


Friday, 18 March 2011

Little Girl's Hairstyles: Mini French Braids 10-15 Min

How did all the St. Paddy's day hairdos turn out? I saw some really cute ones when we were out and about that day. After a playdate on the play place at Carl's Jr., preschool, jumping on the tramp, and then a birthday party that evening, our shamrock hairdos were looking a little sad--but then, what hairdo would still look good after all of that? The gals got to play!

This was a quick hairdo before preschool one day, that I had grand designs for, but an impatient child stopped those before they got too far along. I was still happy with the result, and so was she (since she loves ANY hairstyle that leaves her hair DOWN). And I apologize I don't have a picture from the top down that shows both sides of the french braids, but, again, trying to get her out the door, and keeping her happy at the same time!


 I started this french braid hairstyle with an angle part (going from a side part beginning and going diagonal across the top of her head).
 I parted off on the larger side, down to her ear, prepping for the first french braid.
 I did a french braid a few inches long, secured with an elastic, and parted off my next french braid section, keeping it equal to the first.
I repeated this one more more time, making three mini french braids on this side.
 On the opposite side, I did two more mini french braids (I did use a backwards/dutch braids on mine, but do whatever is best for you).
 If you have the time and oomph, flat iron or curl the rest of her hair, if needs be. Or just keep her smiling and say, "Hey, we are done!"


 Happy Weekend Gals! We are off to dance competitions tomorrow, and more fun home painting projects (the nesting is really kicking in--my wonderful hubby is being kept BUSY!)


Tuesday, 15 March 2011

Little Girl's Hairstyles: St. Patrick's Hairdo: The Shamrock Hairdo 10-15 min

The Shamrock Hairdo

I've been browsing some other hair blogs to see their takes on the 'clover' (because, really, what else can you do for St. Paddy's? A leprechaun perched on their head?), and all the hairstyles were frankly just too complex for me! Perhaps because I'm pregnant, or lazy, or the combo of the two, so I had to do something a little easier and faster (they were all super cute--but just TOO much work for me!). You can do this with whatever kind of braid you are in the mood for. I opt for a twist braid because it's FAST!

First, I start with thoroughly dampened hair, and comb it all back into a mid-height ponytail.
 Then since I was going only for a 3 leaf clover, I did three twist braids. You can see my video on twist braids to learn how to do them if necessary. I did one twist braid from the top portion of the ponytail, and then split the underneath into two sections.
 I then made a 'stem' by ponytailing off a low section. Where you put this secondary elastic will depend on the length of your braids. I did my other daughter's hair, which is much shorter, and so her 'stem' is much shorter as well.
 I then brought the 'stem' portion up to the middle or base of the ponytail like pictured, and then laid the twist braids out like the leaves of the clover.
 I then used bobby pins to hold them in place. You may want to crisscross two where I show this one.
 Pin all three (or four if you want a 4 leaf) in place well.
 Then I stuck two bobby pins down through the base of the ponytail and the top part of the stem to hold it in place.

 I added a green bow at the top of the stem.

 Now for the short hair version: My older daughter's hair just touches the tops of her shoulders. Here's her twist braids pinned up into the leaf sections. Notice how short her 'stem' is. I bobby pinned these braids to each other, rather than to her head, and then down through the base of the ponytail again. I liked how they stood up!


 I may want to trim this ribbon before I use it again.....but it's all ok!


A Irish Wish for a Friend


Wishing you a rainbow
For sunlight after showers—
Miles and miles of Irish smiles
For golden happy hours—
Shamrocks at your doorway
For luck and laughter too,
And a host of friends that never ends
Each day your whole life through!

Happy St. Patrick's Day to you!

Monday, 28 February 2011

How to do Little Girl's Hairstyles: Twist Braids into Loops 10-15 Min

Some of you may remember my Loopy Do from awhile ago. This is an easier quicker version of that (which is always my favorite). I just really really like the twist braids pulled up in loops I guess (when you have long twist braids). I also really like the ends of the hair waterfalling over the ponytail-just love it!

I parted off the front section of her hair (from forehead to behind ears) into three equal sections. I put each section into a ponytail, and then pulled it all back into a mid-height ponytail in the back.


 I then did three twist braids in her ponytail, and then looped them up and fastened them with another elastic at the base of the ponytail. I ratted the ends of her hair a bit and hairsprayed them to 'waterfall' over the ponytail.
 SO easy! (If anyone has a problem with all of my 'easy' hairdo's, please let me know--and I'll try to come up with some difficult, time-consuming hairdos more often!). :)

Have a super week!


Friday, 31 December 2010

How to do girl's hairstyles: Triple Ponytail Loop 10-15 min

I hope you all are having a joyous time welcoming in the new year! Any really outstanding new year's resolutions? Mine always involve 1: eating better 2: exercising more. BUT, at least for the first few months of the year, I can let myself off the hook (hey, I'm pregnant!). And I'm going to enjoy it!!

SO, onto the hair! Some of you may remember the Pony Loop hairdo, I shared back in January of last year. This is a variation on that idea. Three ponytail loops, one on top, two on the bottom!

 I parted off a small section in the front top of her hair, and put it in a small ponytail, which you can see in this picture. I did this to secure those little wispies she has. If your daughter has bangs or shorter hair in front, doing this will help keep a smoother look. Next I parted off the top half section of her hair, and put in an elastic. Having damp hair, and/or using a lightweight gel will help keep these loops in nicer as well. See my instruction on how to do the pony loops here.
 Part off the remaining hair underneath into two sections, complete two additional pony loops, and spray well with hairspray.
 I love the slick smooth look of this hairstyle. I also used the small bobby pins underneath the wrapped hair to secure it down if needed.
 Happy New Year!


Thursday, 16 December 2010

Little Girl's Hairstyles: Kitchen Sink Hairdo 10-15 min

Hey ladies! How is the holiday madness going for everyone?  Why does this time of year just fly by so quickly?
Here's a bit of Shaunell's ramblings:
I was thinking last night that I just don't feel like I've done enough this year (as always). I don't think I've done enough to show my kids, and also for myself, what this wonderful season is all about. I always have high hopes about serving, giving, and teaching my kids the importance of being selfless, especially at this time of year. And, I just don't feel ever like I do enough. This is something that rings true for most moms I think, and not just at this time of year.
Our church leaders (I've included the link to the talks they gave if any of you would like to listen) this year have told us to prioritize, and not let our hectic schedule dictate what we do, but instead, to let the spirit of the season be our guide. I hope we can all follow this sound counsel, as I have made some goals to cut out some activities for the next week, and spend some quality time with my children and husband, and together we'll decide how to spend the rest of our time this season. I hope you can all do the same, if you are able!

Now that I've said my peace, here's a little hairdo we did a while back, that I called, "Everything but the kitchen sink". It's a melange of just everything!
 I parted off her hair in front into a side part, and put the larger side into one ponytail. running it into a second ponytail on the same side.
 I brought the smaller side of the part around to the back of the head, and combed all the rest of her hair, including the second-ponytail-side into a 3rd pony, leaving about 1/3 of her hair remaining down.
 I did a fish tail braid with the hair coming out of the 3rd ponytail, all the way to the ends. Next, I combed all the rest of her hair, along with the fish tail braid, into a 4th ponytail. With the hair remaining unbraided in this ponytail, I did a twist braid, down to the ends. We tied a ribbon around the base of the 4th ponytail, and voila!
 We love variety!

Friday, 3 December 2010

How to do girl's hairstyles: A puffy braid into stuffed buns 10-15 min

I love these puffy braids, done low and just along the hairline next to the ears. Nothing too fancy, but just a little bit different!
I parted her hair into a side part in the front, then zagged over for a center part to go down the back. 
 Next I started parting off into the sections for the puffy braids. I did pull through's on the ponytails to give it some interest. I tried keeping it next to the edge of her hairline. I think it gives it more of an 'antique' look, like something from Little House on the Prairie.
 I traveled the puffy braid down to the nape of her neck on both sides.
And I ended the ponytails in stuffed buns. See my video on how to do stuffed buns here.
 Finished look


This is a great one for short hair too!