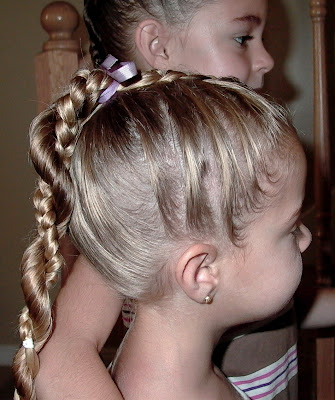
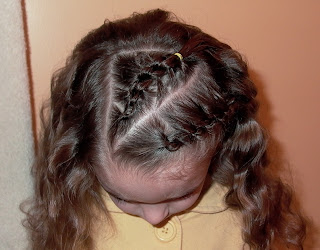
Double Spiral French Braids:
Showing posts with label french braid. Show all posts
Showing posts with label french braid. Show all posts
Wednesday, 10 August 2011
Little Girl's Hairstyles: Double Spiral French Braids Video Tutorial
Here's a fun little hairstyle we tried out one day and really ended up liking! You know me gals, I love anything with braids! Forgive my messy bedroom--I never realize how much actually ends up in these videos. I was doing hair, not worried about that blanket hanging out from under my comforter!
Double Spiral French Braids:
Double Spiral French Braids:
Monday, 18 April 2011
Little Girl's Hairstyles: Easy Twist Around Braided Ponytail 10-15 min
Well, here's a funny thing: I could have sworn I'd already posted this hairdo! Am I crazy? Does this look familiar to any of you? I searched and searched, and could not find it anywhere! If anyone of you find it elsewhere, please let me know! If not, then here's a new one for you! I was going to use this as one of my 'Blast from the Past' hairdos, since I happened upon the pictures and was reminded of how much I liked this hairstyle, but ........a new hairstyle is great too!
Twist Around Braided Ponytail
I then just twisted the remainder of her loose hair and wrapped it around the braid, and secured the ends with an elastic. Keeping the hair damp, especially in the twist, will help keep the hairdo in longer and looking more finished. Spray both sides of the finished braid well with hairspray, and she's done!
Those cute bows and smiles finish it off nicely!
Monday, 4 April 2011
Little Girl's Hairstyles: Off centered braid and twist hairstyle 15-20 min
Happy April! This is my favorite time of year! All my bulbs are coming up (along with the weeds), but I just love watching everything start to blossom and turn green again, rather than the drab brown patches I've been looking at all winter! So in preparation for the Easter holiday, here's a little 'series' I'll be sharing in the next few posts:
This is a 'progressive' hairstyle, I like to call it, because I use the first part of this hairstyle, with the off-centered french braid and twist in a few different hairstyles--which I build on, to give you more ideas and variety. This hairstyle has a french braid, a twist, a twist braid, a stacked pony, and a regular braided ponytail-but it's still easy and basic! Like most of my 'basic' components, I have videos on how to do them. Feel free to check those out for the french braid and the twist braid if needs be in the Video Tutorial section.
I then part down to her ear on the larger side. This is where I will be doing the french braid.
I french braid back to the part, and then continue with a regular braid, just far enough to reach a little past the center of her head in the back.
Then on to the smaller parted section.
Comb neatly and begin twisting towards the center of her head.
Join them off-centered like so, with an elastic.This is my stopping point for the other hairstyles I'll be showing you soon.
From this point, I do a twist braid down to the ends of her hair
And then secure the rest of the hair into a low ponytail.
I pull the ponytail over the top of the joined braid and twist,
and make a stacked pony and wrap the twist braid around base of the ponytail. I use a clear elastic to secure the twist braid in place. I then braid the ponytail down to the ends. If your daughter's hair isn't long enough to do the twist braid, just wrap it around the ponytail base.
You'll need to plan a few extra minutes if you want to do all the twists and braids, but it's a fun one to do! I really like the off-centered look of the ponytail when she's all done.
Friday, 18 March 2011
Little Girl's Hairstyles: Mini French Braids 10-15 Min
How did all the St. Paddy's day hairdos turn out? I saw some really cute ones when we were out and about that day. After a playdate on the play place at Carl's Jr., preschool, jumping on the tramp, and then a birthday party that evening, our shamrock hairdos were looking a little sad--but then, what hairdo would still look good after all of that? The gals got to play!
This was a quick hairdo before preschool one day, that I had grand designs for, but an impatient child stopped those before they got too far along. I was still happy with the result, and so was she (since she loves ANY hairstyle that leaves her hair DOWN). And I apologize I don't have a picture from the top down that shows both sides of the french braids, but, again, trying to get her out the door, and keeping her happy at the same time!
I parted off on the larger side, down to her ear, prepping for the first french braid.
I did a french braid a few inches long, secured with an elastic, and parted off my next french braid section, keeping it equal to the first.
I repeated this one more more time, making three mini french braids on this side.
On the opposite side, I did two more mini french braids (I did use a backwards/dutch braids on mine, but do whatever is best for you).
If you have the time and oomph, flat iron or curl the rest of her hair, if needs be. Or just keep her smiling and say, "Hey, we are done!"
Wednesday, 22 December 2010
How to do girl's hairstyles: Low Side French Braids into braided ponytail 15-20 min
So Christmas is right around the corner!! We just got a whole ton of snow, and my girls' have been out playing and attempting to build a snowman this afternoon. There's nothing better and more magical than a beautiful white blanket on everything outside. That is, until you have to go out and drive in it or shovel it off your driveway, right! Even still, I love seeing how pristine and clean the snow makes everything look. It just seems fitting for this special season and holiday. So what I'm saying is, I'm grateful for the snow! I am also looking forward to not having to send off my kids to school or dance or anywhere else for a few weeks and just have the chance to hang out and have fun!
Did I mention we are expecting girl no. 3 this spring!? I gotta get some good one on one time with my girls now before Mom is totally swept up in baby! We are so excited to have another little princess and of course, more hair to do!
So, on that note--here's another little hairdo to try out. I must really be in the pioneer-type-hairdo mood lately, as this is another one that reminds me of young girls from that era. I just think it's a refreshing change to see little girls look like little girls, rather than putting grown up hair on them. Who needs them to grow up any faster than they already do?
Low Side French Braids
I continued them all the way to the back of her head.
And same on the other side.
This is where it can get tricky. After finishing both braids, I took out both elastics holding the braids, smoothing the hair so both braids were hanging straight down in my one hand. I tried to meld the hair together into one bunch, without losing any of the braiding, so I could begin a fresh braid.
Once I did that, I just finished off with a backwards braid all the way to the ends.
Tie it off with a ribbon (I like mine up higher, rather than at the ends..they seem to stay in better for me there) and smile!
Here's wishing all you wonderful moms and your families a wonderful Christmas! Enjoy those magical moments with the little ones. I've made a goal to NOT let messes get me in a dither and to just take a deep breath and ENJOY myself. They'll only be these ages once! Merry Christmas!
Wednesday, 25 August 2010
Little Girl's Hairstyles - How to do hair for School Pics!
I don't know about the rest of you, but School Picture Day is probably one of my most stressful mornings (pathetic, I know). I stress because:
1: I can't be there to rearrange, comb, spritz anything back into place, and
2: how do I get the hair to STICK, look natural, but not move until it's picture time?
I justify my erratic and tense behavior because, as I tell my girls, "I'm paying for these, so I want them to be PERFECT." So, now that you are feeling sorry for my children, let me share with you some possible ideas, that I think would be SUPERB for picture day.
I really really like my girls' hair down for pictures. I think that if I'm going to do something fancy, it should be visible, and since most of my fancy stuff is in the BACK of the head, it does nothing for their pictures, which I really want to show off their cute little faces. So, here's some of my favorites, with the hair down, that I think we'll be choosing from, since our picture day is tomorrow!
But, I know some of you may want to have the hair up, so I've picked a few faves for you too. They are at the end. Enjoy! Good luck with your morning!
Hair Down
Rosettes/Twist Bun Headband (I will be sharing a video on how to make the actual headbands soon!)
Hair Up
If you wanted to eliminate the top twists, I think a side bun with a flower would be adorable for pictures as well. I'm leaning towards this hairdo myself.....
Subscribe to:
Posts (Atom)


