Showing posts with label twist braid. Show all posts

Monday, 4 April 2011

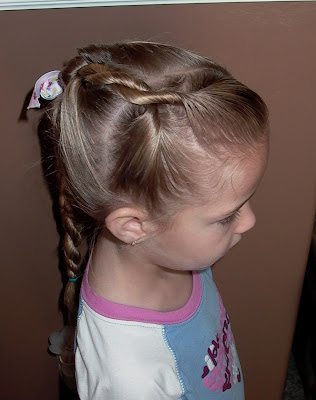
Little Girl's Hairstyles: Off centered braid and twist hairstyle 15-20 min

Happy April! This is my favorite time of year! All my bulbs are coming up (along with the weeds), but I just love watching everything start to blossom and turn green again, rather than the drab brown patches I've been looking at all winter! So in preparation for the Easter holiday, here's a little 'series' I'll be sharing in the next few posts:

This is a 'progressive' hairstyle, I like to call it, because I use the first part of this hairstyle, with the off-centered french braid and twist in a few different hairstyles--which I build on, to give you more ideas and variety.  This hairstyle has a french braid, a twist, a twist braid, a stacked pony, and a regular braided ponytail-but it's still easy and basic! Like most of my 'basic' components, I have videos on how to do them. Feel free to check those out for the french braid and the twist braid if needs be in the Video Tutorial section.

 To begin, I started with, of course!, DAMP hair. This is pretty much the case with about 99% of my hairdos. I give her a center part, back to the ear line.
 I then part down to her ear on the larger side. This is where I will be doing the french braid.
 I french braid back to the part, and then continue with a regular braid, just far enough to reach a little past the center of her head in the back.

 Then on to the smaller parted section.
 Comb neatly and begin twisting towards the center of her head.
 Join them off-centered like so, with an elastic.This is my stopping point for the other hairstyles I'll be showing you soon.
 From this point, I do a twist braid down to the ends of her hair
 And then secure the rest of the hair into a low ponytail.
 I pull the ponytail over the top of the joined braid and twist,
 and make a stacked pony and wrap the twist braid around base of the ponytail. I use a clear elastic to secure the twist braid in place. I then braid the ponytail down to the ends. If your daughter's hair isn't long enough to do the twist braid, just wrap it around the ponytail base.


 You'll need to plan a few extra minutes if you want to do all the twists and braids, but it's a fun one to do! I really like the off-centered look of the ponytail when she's all done.

Tuesday, 15 March 2011

Little Girl's Hairstyles: St. Patrick's Hairdo: The Shamrock Hairdo 10-15 min

The Shamrock Hairdo

I've been browsing some other hair blogs to see their takes on the 'clover' (because, really, what else can you do for St. Paddy's? A leprechaun perched on their head?), and all the hairstyles were frankly just too complex for me! Perhaps because I'm pregnant, or lazy, or the combo of the two, so I had to do something a little easier and faster (they were all super cute--but just TOO much work for me!). You can do this with whatever kind of braid you are in the mood for. I opt for a twist braid because it's FAST!

First, I start with thoroughly dampened hair, and comb it all back into a mid-height ponytail.
 Then since I was going only for a 3 leaf clover, I did three twist braids. You can see my video on twist braids to learn how to do them if necessary. I did one twist braid from the top portion of the ponytail, and then split the underneath into two sections.
 I then made a 'stem' by ponytailing off a low section. Where you put this secondary elastic will depend on the length of your braids. I did my other daughter's hair, which is much shorter, and so her 'stem' is much shorter as well.
 I then brought the 'stem' portion up to the middle or base of the ponytail like pictured, and then laid the twist braids out like the leaves of the clover.
 I then used bobby pins to hold them in place. You may want to crisscross two where I show this one.
 Pin all three (or four if you want a 4 leaf) in place well.
 Then I stuck two bobby pins down through the base of the ponytail and the top part of the stem to hold it in place.

 I added a green bow at the top of the stem.

 Now for the short hair version: My older daughter's hair just touches the tops of her shoulders. Here's her twist braids pinned up into the leaf sections. Notice how short her 'stem' is. I bobby pinned these braids to each other, rather than to her head, and then down through the base of the ponytail again. I liked how they stood up!


 I may want to trim this ribbon before I use it again.....but it's all ok!


A Irish Wish for a Friend


Wishing you a rainbow
For sunlight after showers—
Miles and miles of Irish smiles
For golden happy hours—
Shamrocks at your doorway
For luck and laughter too,
And a host of friends that never ends
Each day your whole life through!

Happy St. Patrick's Day to you!

Monday, 28 February 2011

How to do Little Girl's Hairstyles: Twist Braids into Loops 10-15 Min

Some of you may remember my Loopy Do from awhile ago. This is an easier quicker version of that (which is always my favorite). I just really really like the twist braids pulled up in loops I guess (when you have long twist braids). I also really like the ends of the hair waterfalling over the ponytail-just love it!

I parted off the front section of her hair (from forehead to behind ears) into three equal sections. I put each section into a ponytail, and then pulled it all back into a mid-height ponytail in the back.


 I then did three twist braids in her ponytail, and then looped them up and fastened them with another elastic at the base of the ponytail. I ratted the ends of her hair a bit and hairsprayed them to 'waterfall' over the ponytail.
 SO easy! (If anyone has a problem with all of my 'easy' hairdo's, please let me know--and I'll try to come up with some difficult, time-consuming hairdos more often!). :)

Have a super week!


Thursday, 17 February 2011

Little Girl's Hairstyles: Progressive Twist Braid: 7-10 min

Oh it's so good to be back! I guess you just don't appreciate what you have until it's gone, right? I thought things about blogger were a pain.......but that's only until I tried doing the same things (with my super UN-tecchy expertise) in a different format. This is probably so humorous to most of you who can do all this stuff with ease, but really, for some of us, it's a major struggle! Ah well, thankfully we are back (feels like home) and we can get on with the hair! Thanks for the patience!

Here's another easy and simple hairdo for your little girl that will work great on school mornings. It would probably need at least close to shoulder length hair to stay in well, but it can work on slightly shorter hair as well.
Start with damp hair, and do an angle part from the forehead to back behind the opposite ear.
 Divide that section in half, on the side you parted off, and prepare to do a twist braid.
 Do a twist braid to the ends of the hair, and secure with an elastic.
Next part off the second section of hair, going from the far side, behind the ear, to the other ear. Divide in half, prepping for another twist braid.
 Take the first twist braid, and wrap it with right section of your second twist braid, as pictured.
 Continue with the twist braid.
 Finish down to the ends again, and secure with elastic.
 Gather the rest of the hair, divide, and repeat what you did with the second twist braid, adding it in again. Twist braid down to the ends of the hair.
 Finished side.

 I like to put a bow or flower at the base of her neck, when she's sporting a long braid. It's just where it stays in, and doesn't catch on anything while swinging around.
We don't know what prompted the ill at ease face......but it's ok, we are still happy with how the hairdo turned out!
 Happy Blogging to all of you!