Showing posts with label corkscrew curls. Show all posts

Wednesday, 5 January 2011

Little Girl's Hairstyles - LOOK what we did!! Triple Twist Braids 5-7 min

Well, just look what we did:
 If it's not immediately obvious, we cut off about 10 inches off my oldest daughter's hair! This actually did happen a while ago.....since this picture of her was taken in her Halloween costume (ha ha), and I've just been slow at getting it up here. It has been FUN having a gal with a head of short hair (and FASTER thank goodness). We've had a good time coming up with different ideas to do with her now short bob. So here's one of first samplings:

Hanging Triple Twist Braids:

I initially parted off her hair on one side (first a side part), and then back to her ears. I then sectioned that part into three sections, as you can see here, diagonal partings. I then did small (much smaller than I'm used to!) twist braids in the middle of each section.
 I then did some corkscrew curls in the back with my 1/2 inch curling iron, and finger combed them after.
 I think she's darling! It's given us a whole new sense of fun when it comes to hairdoing time! It's been interesting to experiment with hair this length--and find out that yes, ponytails are still possible! I'd love your greatest ideas on this length of hair!
Hurray for short hair!

Wednesday, 25 August 2010

Little Girl's Hairstyles - How to do hair for School Pics!

I don't know about the rest of you, but School Picture Day is probably one of my most stressful mornings (pathetic, I know). I stress because:
1: I can't be there to rearrange, comb, spritz anything back into place, and 
2: how do I get the hair to STICK, look natural, but not move until it's picture time?
I justify my erratic and tense behavior because, as I tell my girls, "I'm paying for these, so I want them to be PERFECT." So, now that you are feeling sorry for my children, let me share with you some possible ideas, that I think would be SUPERB for picture day.

I really really like my girls' hair down for pictures. I think that if I'm going to do something fancy, it should be visible, and since most of my fancy stuff is in the BACK of the head, it does nothing for their pictures, which I really want to show off their cute little faces. So, here's some of my favorites, with the hair down, that I think we'll be choosing from, since our picture day is tomorrow!
But, I know some of you may want to have the hair up, so I've picked a few faves for you too. They are at the end. Enjoy! Good luck with your morning!
Hair Down
Rosettes/Twist Bun Headband  (I will be sharing a video on how to make the actual headbands soon!)

Hair Up
If you wanted to eliminate the top twists, I think a side bun with a flower would be adorable for pictures as well. I'm leaning towards this hairdo myself.....

Friday, 6 August 2010

Little Girl's Hairstyles- How to do a Twist Braid Updo Video Tutorial

One of you fantastic ladies asked if I could do a video on an updo, and one that could be used at a wedding. Well, I hope this passes wedding muster! I've always been partial to hair piled up top with curls cascading down. Add in a ribbon and some baby's breath, and I think this will be fancy enough to throw out some rose petals!
I want to say a big THANK YOU to my sweet 7 year old too, she filmed this video for me! It was lengthy too (the filming), and she did pretty darn good I think (this will explain some of the bouncy bounce)! Thanks punkin!
AND, I apologize that the video is broken in two parts. You Tube did not like the length of my original, so I had to divide it.


One thing I wished I'd tried for video is this: Hot glue some little silk flowers on bobby pins and pin them around the ponytail up top. Match it to her dress! You can also use wide ribbon or even do 2 ribbons encircling her head.

Happy wedding day! Send us some pics!

Friday, 4 June 2010

Little Girl's Hairstyles -- How to make a 3 rosette headband 10-15 min

This headband was my inspiration for this hairdo. This was made by yours truly, and yes, it should have 3 roses, instead of 2, but my rose sizes went askew, and so I layered my biggest and smallest, and heck, I just liked how this looked better..BUT, the idea is to have 3 roses, in the hairdo.
                                      
This was my first attempt of the day, on my older daughter. Her twist buns or rosettes were closer together than in the hairdo that illustrates how to do this, but you'll get the idea.
                                            
Part from ear to ear.
And comb over to one side, making the front part damp. The damper the hair, the better and longer it stays in the twist bun.
Divide the front section into 3 ponytails. Try to put the ponytails as close together as you can, by centering the middle section's elastic, and bringing the two sides elastics as close to the part as possible. The right pony pictured is close, but the left side could have been closer.
Begin twisting the ponytail
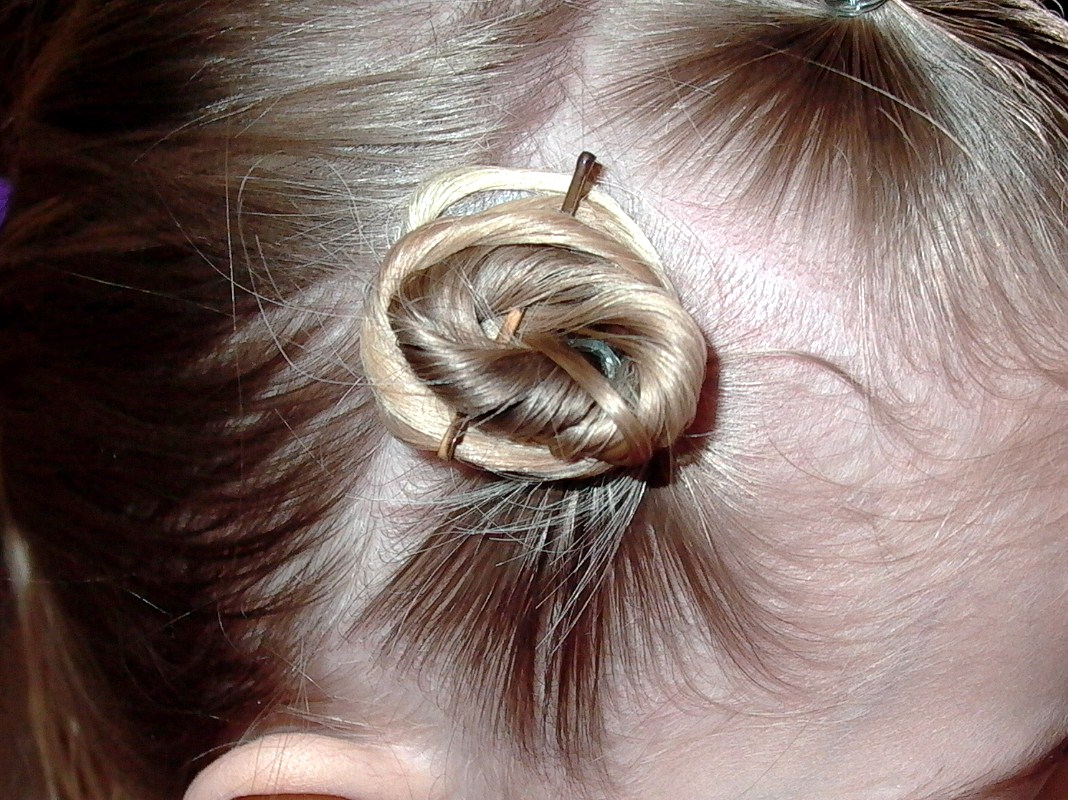
and then wrap it around the elastic, but not tightly. You want to wrap it flat against the head, but close enough together to fill in gaps.
When you get to the ends
Take a mini pin and secure it tightly. The mini pins are great because they fit in these little rosettes or twist buns.
Continue with the other two ponytails and make them twist buns/rosettes. Use more bobby pins or mini pins to make them secure, and try to wrap them so they lay as close as possible to each other.
After I made the three twist buns/rosettes in front, I did corkscrew curls in the back of her hair.
This works well on those shorter lengths as well. If the hair is not long enough to make a twist bun, then do 3 half pulled through ponys, and bobby pin them down flat if possible. I apologize I don't have a head with shorter hair to demonstrate on!  Have a marvelous weekend!


Wednesday, 26 May 2010

Little Girl's Hairstyles - How to use a curling iron / corkscrew curls Video Tutorial

We just had a little too much fun with this one.....but what can I say? My gal sits for me through these things and is so patient and wonderful. She was all giddy at actually getting to make a peep for once!

Friday, 7 May 2010

Little Girl's Hairstyle - Twisted laces in crown 10-15 min

This is a variation on two hairstyles that I've shared earlier. First, it's similar to my regular Twisted Laces, and also it's like my Side Puffy Braid.
I don't have step by step pictures, but I did a side puffy braid, but twisted it, making laces, instead of going from 2 to 3 ponytails and back to 2.
I finished the ends with a twist braid.
And did corkscrew curls in the back. I have a corkscrew curls video coming soon!
Enjoy and get ready for some compliments!!!


Monday, 18 January 2010

Little Girl's Hairstyles -Puffy Braids with Headband and Corkscrew Curls 15-20 Min

Here's a "Half and Half" hair do. I have seen versions of this idea at various times, and have always had mixed thoughts on them. "Is her hair supposed to be curly? Should only parts of that be crimped/curly?" I just decided to try it out for myself, and I think it's a keeper!
This is what we started with: Mostly straight, but with some pesky waves underneath.
So I lightly misted her hair with water and round brushed it all straight.
Next I parted off the headband section, and clipped the back away. I parted off the first of 5 ponys, each about 2 inches wide.
I pulled the first 3 ponys into the next, like here.
After the 3rd, I parted off the next 2 sections.
I put in an elastic in the last pony first, since I wanted to join both the bottom pony and the top into this last pony.
Here's what it looked like after I put in both sides.
Next (and I'm not sure why I don't have pictures of this ....) I did corkscrew curls, using my 1/2 inch curling iron, around the back of her head. I took pieces only from the top, right next to the parted off headband, only going about an inch down from the headband, and I did a corkscrew curl. I then did the same inch tall section next to it, and so on until I'd done all the way around her head. Let the curls cool, and then comb through them lightly, from underneath, with your fingers, to separate the hair and spread them out a bit.
This shows better what pieces I curled going around the back of her head.
This big flower bow came from KayteBug Boutique. Excuse the goofiness. She'd had enough hair for the day.