Wednesday, 27 October 2010

How to do girl's hairstyles: October's Creative Genius!

This month's Creative Genius shares an adorable Flower Fairy Hairdo, which I thought was so cute and just in time for Halloween!
 Her name is Angela Jones, and if you are a regular visitor to my Facebook page, you will have seen one of the many fabulous hairdos she regularly posts there. I saw this one and knew this one was just perfect for those of you asking for Fairy hairdos for Halloween.

Thanks Angela! And the rest of you, feel free to share any pics of Halloween hairdos any of you have done this year, including this one or Rapunzel!

To start the Flower Fairy Hairdo:
Part hair into 2 ponytails & flip them under as seen.
Split top hair into 4 pieces & tie a loose knot in each. 
Take the 4 pieces & add them together, at the top join them together using a bobby pin & pin them to the top of the scalp. 
Because the knots are loose they can be moved & pinned into desired shape seen here.
Next, move onto the bottom ponytail, take sections & curl them using a curling iron.
Pin up each curled section as desired adding flowers as you go. 
Pin the sections making your way up to the top so as to join the two ponytails. 
After you have your curls sitting were you want, add the desired accessories, you can leave the sides or little curls hanging down if you like & we are done.

SOOOOOO cute! Thanks again Angela, and to the rest of you who sent in pictures! Keep them coming! I consider ALL I've received when picking out the next month's CG.
Happy Halloween! Be safe, be warm, and have fun!


Monday, 25 October 2010

How to do girl's hairstyles : How to do a Rapunzel hairdo for Halloween 7-10 min

It's Rapunzel!

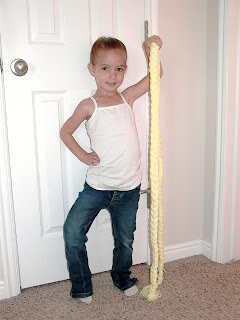
My little gal wants to be Rapunzel for Halloween, and although she has long hair, it's not nearly long enough for Rapunzel! We had to be a little creative for her hair, and I thought I'd share it with you....in case any of your princesses want to be the same. It's an easy cheap costume and turned out pretty darn cute! Here's the  final outfit:
For Rapunzel's hair, I first braided her own hair back into a high pony, and then braided her ponytail.
 I then wrapped the braid around itself, and bobby pinned it in.
 Use as many as you need to secure it well.
 I purchased some yarn that was close (compared to the other colors!) to her hair color (this is what was left after we made the braid).
 We made a braid out of the yarn that was about twice as tall as she was. To get that approximate length, I cut about 50 strands (to make it nice and thick) about 9 feet in length, or 3x her height. My finished braid was about 2/3 of that. I wanted enough to wrap around her head, and then hang down.
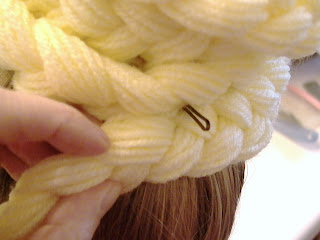
 To secure the braid, I wrapped one end of the braid under her already wrapped braid, and bobby pinned it in.
I then wrapped it about 4 times (or until you get the right amount left that you want to hang down), bobby pinning as I went.
 When I got it to where I wanted it to go over her shoulder, I bobby pinned it like so, in the back middle of the bun.
 I used 2-3 bobby pins to keep it in tight.
 She put on one of her dress-ups and voila! Rapunzel!


We'll add in some jewelry and of course some makeup (her favorite part of Halloween) come parties and trick or treating this week, but I was pleased with the results!
Happy costume making!

Wednesday, 20 October 2010

How to do girl's hairstyles : How to do a Side Braid Flip 7-10 min

Hi Ladies! Here's a little hairdo I saw on a little gal not too long ago, and just thought it was great, not only because it was adorable, but most importantly, you could do it in a reasonable amount of time! Please forgive the grumpy face we have pictured here. We are a real life family, full of grumps and bumps, and it was one of those mornings. She did consent to pictures, although with a sigh and a "Oooooooookay!" Bless her little grumpy heart.

To start, I combed wet hair over to a side ponytail, with a side front part, and put the ponytail back behind the ear.
I then split her ponytail in half, and braided both sides, down the ends.
I then brought the braid ends up to the ponytail, ends out.
I took a clear elastic and wrapped it around to secure the braided ends. Don't mind me trying to take a picture while keeping my fingers in the elastic, for the sake of showing you what I was trying to do. The circulation did return, thankfully.:)
I finished it off with a cute little flower, sticking the clip down inside the elastic, and sprayed it well with hairspray. I also sprayed the ends and tried to fan them out around the flower, so they don't look straggly. You can also curl them real quick with an iron if they need some extra help, or pin them back using even the bow clip.
And we got a smile by the end........


Friday, 8 October 2010

How to do girl's hairstyles: Pull Through Angled Ponytail 7-10 Min

It's October already! The rain and wind are here, and it's bye bye to the sunshine for us! All you fabulous ladies that want to be considered for this month's Creative Genius, send me your stuff by Oct. 15th. You can post it on my Facebook page,  or you can email me at girlzhair@gmail.com. This month I'm looking specifically for some fun Halloween hairdo's. I'll definitely be posting pictures you send, since I can't post everyone's how-to's, but I'm looking forward to seeing it all! I have a TON sent in already, which can always go into the pool for the coming months, so if you aren't showcased this month, never fear, there's always a chance you will be later. You ladies are brilliant!!

Here's a fun easy little hairdo, since that's what we are all about. It's a series of 5 pull through ponytails, traveling at an angle across the back. Super easy, fast, and we think, pretty cute! If your daughter's hair is not long enough to keep pulling the ponytail into the next, just leave the ends out, and keep on with the pattern, it will still be cute!

 I started by dampening the hair, and then combing it all to the angle I'll be following while doing the pull through ponytails.
On the same angle, part off your first section, and create a pull through pony in the center. 
Part off your same similar size section, and include the first ponytail's hair, and do another pull through ponytail. 
 Follow this pattern across the back of the head. Again,if your daughter's hair is too short,leave the ends out, or space your ponytails closer together or farther apart, depending on what will look better.
 We finished up with 5 pull through ponytails, and left her ponytail over her shoulder.

And C'est Magnifique! If you have time, you can band off the ponytail in even sections, or curl it, whatever you feel like!
Looking forward to all your fun Halloween do's! Happy Fall everyone! Go take some family pictures out in the trees, make some leaf rubbings, and drink some apple cider. This is my favorite time of year!