Alright ladies....this has to be my favorite video, not necessarily because of what I am trying to teach here, but because of my little gal, who is the star of the show. This was hairdo number #6 and video number #75 this particular day, (it's a big setup getting the stars ready for the videos, complete with bribery and art tools, so we try to maximize our time), and she was DONE, as you'll be able to tell by her parting comment. I just have to say that I enjoy doing my little gals' hair so much because this is when we chat and spend that necessary girly time together.
So don't be sad if you are expecting a fabulous teaching tool here, rather enjoy it for what it is....a moment to chuckle and appreciate these sweet little people. They are precious blessings and I'm so incredibly grateful for mine! Have a super day and have a wonderful Thanksgiving!
Tuesday, 24 November 2009
Monday, 23 November 2009
Little Girl's Hairstyles -Double Side Braid 7-10 Min
This is a great school do, since it's fast! Just a slight variation on the regular old side braid.
Gave her a side part, and dampened the hair.
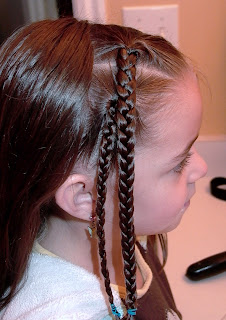
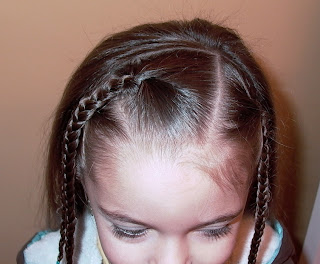
I braided the smaller side into one braid.
I divided the larger side into two sections and clipped off the top section.
I braided the lower section, starting my braid up high in the section, by pulling the hair up when I began.
Start of lower braid.
Next I braided top section.
I clipped in a flower on the top braid. This adorable flower is from and B&B's Buttons and Bows. I love these colors. Go check out their flowers on their cute beanies!
I then round brushed the back of her hair and let it hang down.
And front view again.
Wednesday, 18 November 2009
KayteBug Boutique
Just wanted to pass this along from the gals at KayteBug Boutique! Go check out their darling darling stuff!
From the gals:
We are also offering 15% off on the internet until Nov. 25th. Just enter gat15 in the discount code during checkout. Now's a great time to start shopping for Christmas and we have tons of great stuff that will make great socking stuffers and even friend gifts!!
From the gals:
We are also offering 15% off on the internet until Nov. 25th. Just enter gat15 in the discount code during checkout. Now's a great time to start shopping for Christmas and we have tons of great stuff that will make great socking stuffers and even friend gifts!!
Tuesday, 17 November 2009
CraziBeautiful!!
Have you visited http://www.crazibeautiful.com/? It is a FABULOUS website for all us gals, most especially for those of us who live in Utah. They offer amazing recipes, tips for women and mothers, business advice, and put you in contact with enterprising and smart women who have some really incredible stuff to share. My excitement today is because they are featuring my wee blog!
I feel honored, blessed, and a tad bit emotional, because I love love love their site! Go check them out and take a peek at my little bit--it's under Honoring Womanhood.
Thanks ladies and have a wonderful day!
I feel honored, blessed, and a tad bit emotional, because I love love love their site! Go check them out and take a peek at my little bit--it's under Honoring Womanhood.
Thanks ladies and have a wonderful day!
Monday, 16 November 2009
Little Girl's Hairstyles -The Criss Cross with Braid Handles 20-30 Min
This one was a doozy! BUT I had fun, and that's the point right? After I do something elaborate like this, I feel the urge to go out SOMEWHERE and just show off my little girl, which for us, usually means something exciting like a trip to Walmart. My husband and I thought this one was funny though because the braids on the end of her ponys look like handles....not something to point out to other siblings if you do this 'do on one of your gals!
I started off with WET hair, and parted off the bottom third and pinned up the rest.
I divided the bottom into 4 ponys.
And braided the ponys down as far as I could. The criss-crossing does require a lengthy braid, so if your gal's hair isn't that long, you could skip the crossing and pull them straight up into the ponys.
Next, I zig zag parted the top and back sections of her hair. You could just part it down the middle, or at least just do an angle part up top. After I finished I think I should have parted it straight down the middle in the back. UP TO YOU!
I clipped off one section, and combed the other side up, ready for a pony.
Then I grabbed two braids, choosing alternating braids like so.
Do the same on the other side, weaving your braids. I actually weaved the braids like this before I secured them in the first ponytail, so they wouldn't loosen them after I had them in the elastic.
Prepping next ponytail.
Hopefully you can see how I weaved them here.
Secured in ponytails.
Next I began braiding pony down about halfway, then secured with elastic.
Next I split the remaining hair into two sections, and did two separate braids.
I left long ends on her ponys, to make it look like three separate sections.
These cutie pie bows are from Angela's Accessories. I really love the matching bows, since I do so many hairstyles with two ponys/buns/braids. These were perfect and go with so many different things!
Thursday, 12 November 2009
Little Girl's Hairstyles -Fancy Easy Updo for your big or little gal! 15-20 min
This is a fun fancy updo that most of the time you probably WON'T want to do on your 3 year old. When I have to rely on bobby pins alone to hold up the hair, I know the hairdo just ain't gonna last through the somersaults, frequent wardrobe changes into princess wear, and jumping on the bed.....SO you might want to save this for your older, more 'sophisticated' gals, who need something a little extra special. I had to use my most available model however, so here we go. Fortunately, she has mounds of hair to demonstrate on!
I started off by quickly curling all her hair.
I gave her a side part on top.
I took the front section, and twisted it down low by her ear.
I secured the twist with a bobby pin, in a bobby pin roll.
I did the same on the other side, creating a headband effect in the front of the hair.
In the back of her head, I pulled all the hair up, including the front pieces that I'd bobby pinned off,
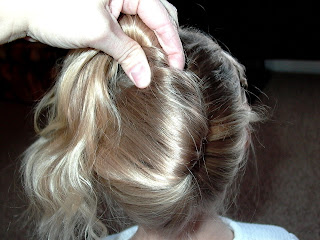
and twisted it all into a large twist.
At this point, you want to roll the hair, in this case, from the left side, over and 'tuck' it over the twist, enclosing the twist. This gives you a french twist.
Next I took several bobby pins and 'combed' the hair that I pulled over with the tips of a bobby pin, and tucked it down under the twist, and pushed it all the way in. It's out here so you can see how it is holding that top hair.
More angles to try and illustrate how to place the pins to hold in the twist.
Bobby pin all the way up and down the twist until it's secure and tight.
After the twist is secure, then I flopped the hanging hair back over the twist.
After combing through her hair, I had to retouch up her back curls quickly.
Stick in a big bow on top (I got this one from KayteBug Boutique)
One thing with this updo is you can make it look sleek and tight, or loose and soft. I did a looser softer look here, with her little wispies all curled (since I knew this 'do wouldn't stay in long anyway), but I love the soft loose curls.
Perfect for prom, parties, special nights out for your big or little princesses!
Tuesday, 10 November 2009
Little Girl's Hairstyles -Angled inside out French Braid 5-7 min
Something simple, but cute! My gal here asked me to do this, since she really likes anything that gives her a bun or pony on the side.
I combed her wet hair over in the angle I wanted to do the braid.
This is my beginning point. For me, I have to really make sure I start in the right spot for anything that goes across the head on an angle. If you don't start out right, your angle ends up...not at an angle. I've done many a hairdo that end up looking slightly off.....rather than at an angle, and believe me, it ain't cute. So map out exactly where you want it to go, and reevaluate where you are braiding as you are going down the head. I had to restart this one twice because I got off track.
I did an inside out french braid here. You can see my video tutorial on regular french braiding if you prefer that, or I will be posting an inside out french braid video soon.
Doublechecking where I'm at here.
She preferred to have a ponytail hanging over the shoulder today, so who am I to disregard what my princess prefers? I braided it down a little bit, so it wouldn't pull on the baby hairs at the back of the neck, and left it in a pony.
This darling match-everything-flower is from B&B's Buttons and Bows. It just goes with anything pink!
If your kids are like mine, they frequently lose those cute cute bows, especially when they are off at school. So here's what I do to (try) help them NOT lose them. I stick the clip of the alligator clip down inside the elastic.
Side view
Her hair is slightly curly, so we do the old twist it around my finger when it's wet trick, and her hair will somewhat stay in a long ringlet like this throughout the day. This is a trick that my Mom used to do on me, and it works great! I spray it all lightly with hairspray, and she's off!
Subscribe to:
Comments (Atom)


