I had a request from one of my readers to show how I made the headband I shared in an earlier post:
How to make a Rosette Headband. I should differentiate between the two, since that was an actual hairDO and this is how to make the actual headband. I had already had a video tutorial for it recorded, since we decided to make some for party favors for my 7 year old's birthday party. What luck!
My sweet 7 year old is the actual film technician again, so please excuse the slight bounciness and the stray finger that gets in there occasionally. We have to make do with the resources available to us!
Enjoy, and be careful with those hot glue guns......they are murder!
Tuesday 28 September 2010
Tuesday 21 September 2010
How to girl's hairstyles : The Mohawk or The Tiara 7-10 min
These two hairdo's have become my youngest girl's new favorite requests. (I think she just likes saying the names we've given to them really, since it's the only time she gets excited for me to do her hair lately.)
So here we have it. First:
The Mohawk

Basically, for both hairstyles, you are just parting the hair into four equal sections, and then putting each section into a stuffed bun. For the Mohawk, I did four equal sections straight down the middle of her head, just like, well, a Mohawk. The more stuffed in the hair, the better. You can even use bobby pins to secure them to her head better.


Spray well with hairspray, and she's done.

I personally like to call it the Horse Mane, since it reminds me of when horse's manes are done up for equestrian shows, BUT the other name has stuck in our house.

And next, we have:
The Tiara (or crown!)
(I bet you can't tell why this is a favorite either...).
We start by doing the same thing, but parting from front to back in equal sections, and putting in more stuffed buns. I found I use bobby pins to pull the stuffed buns together and fill in holes. We also put in these little clips in front. Add whatever works!


We hope your gals have as much fun wearing these as ours do! Happy Stuffing!

Friday 17 September 2010
How to do girl's hairstyles: September's CREATIVE GENIUS!
Welcome to our first Creative Genius post! Our first 'genius' sent me pictures when I asked for Back to School pictures, and I was so in love with her work I asked her to be our first featured hairdo. Her name is Julie Morton, and she has her own hair blog that she does for moms at school and in her neighborhood. Check it out http://www.princesspiggies.blogspot.com/.
You'll see why I was so impressed! This is her hairdo entitled:
Inverted Pull Through Updo


You'll see why I was so impressed! This is her hairdo entitled:
Inverted Pull Through Updo

1. Start by sectioning off a small square of hair in front. Tie your elastic off to the right side of the square.

2. Grab your Topsy Tail or comb for a Pull Through

3. Once you've created your Pull through, tighten the elastic and smooth out the top with a comb.

4. Now gather all of the hair back into a ponytail.

5. Grab your Topsy Tail or comb again but this time you will insert it going up, instead of down.

6. This will create an Inverted Pull Through. Make sure to tighten your elastic and smooth out the hair with a comb.

7. Now grab the rest of the hair and "Barrel Roll" it down to the head by folding the hair over itself and rolling it with your two index fingers inside the ponytail.

8. Once the roll has been created you will want to secure it down with some bobby pins.

9. When the bobby pins are tightly in, spread out the roll so that it creates a semi-circle.
10. Spray the hair with hairspray for hold and you're all finished.
Great work Julie!! Thank you for sharing!!

Tuesday 14 September 2010
How to do girl's hairstyles: More of your back to school pics!!
Thank you ladies for continuing to send pictures of your darling girls' hair for us all to admire! All of your marvelous creativity has sparked an idea for me. Each month I'd like to showcase your talent, if I may. I'm calling it my "Creative Genius Posts". I've seen some brilliant and dedicated hairdoing recently, and I think we'd all love to know just how you do your hairstyles. SO, I have my first Creative Genius all ready to go, which I'll share with you in my next post. If you'd like to participate, I'm planning on sharing at least one a month (or maybe more, depending on what we get), so send me your hairdos!
Here's a few rules:
1. It has to be original pictures and text (or videos). I ask that you give step by step instructions in your own words. Nothing copied from any other website please.
2. Send me pictures in JPG format, and size them so they can fit in an email. If you wish to share a video, please make it under 10 minutes. (I've learned this the hard way recently, if you all remember).
3. If you have your own blog, I ask that you don't post this same hairstyle with the same text on yours. Search engines don't like repeated text!
That's it! Send your hairdo's to girlzhair@gmail.com, and put "Creative Genius" in your subject line. If you'd like your blog noted in the post, please note the url.
I look forward to your ideas!! Enjoy these new cute pics, and thank you again for sharing them. Oh, and for all those that want to contribute for next month....keep in mind I'll be looking for some great Halloween Hair!


Wednesday 8 September 2010
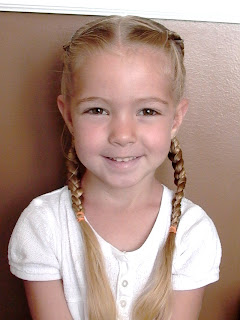
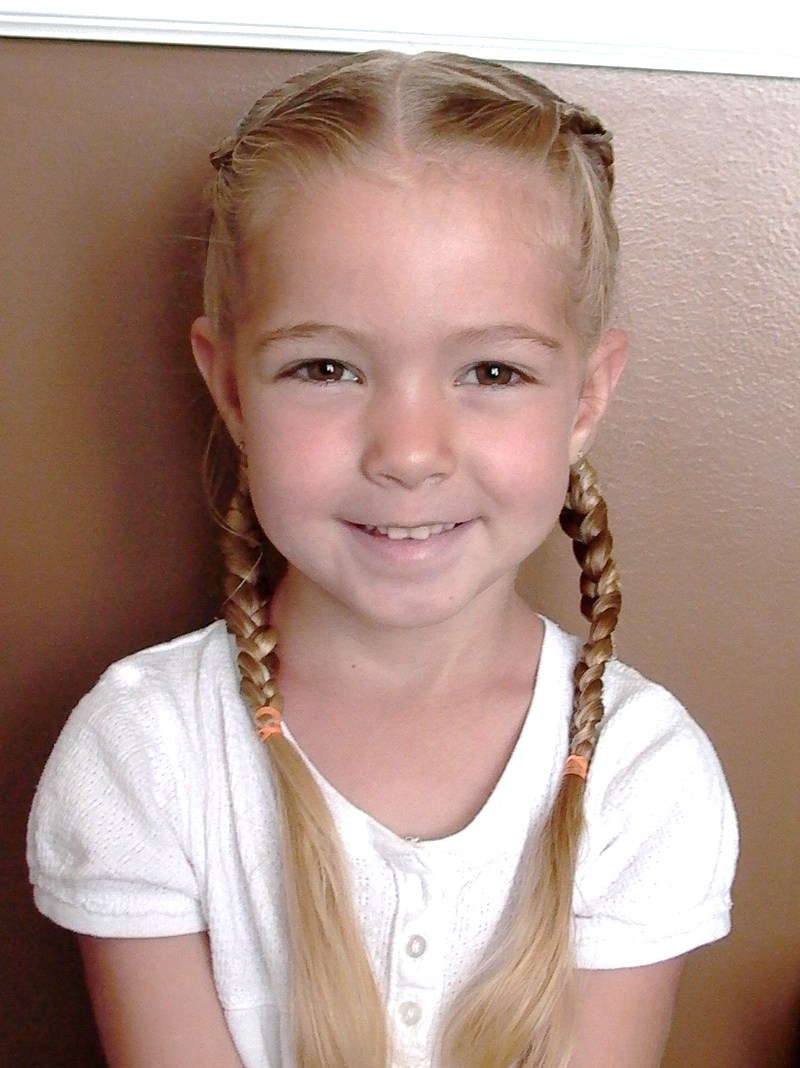
How to do girl's hairstyles : How to do a progressive braid 10-15 min
Does anyone have a girl(s) the age or attitude of or phase or whatever it is, of wanting to do their own hair? (And I mean where it is still difficult for them to do a nice job on it?) We are struggling with that a bit in my house. My seven year old, bless her most headstrong little heart, sometimes refuses to have me touch, help, advise or even get near her hair some mornings. She has learned how to braid, quite well, and put in elastics, rather well, and how to put in ponytails, not so well. I am trying to be brave and let her have some control in her life, and let her learn (because they do eventually have to do it themselves, right!), but it's been a difficult path (sadly yes) for me. Especially when I see the back parting job and it's every which way but loose.......but I must put on a smile and tell her it looks marvelous. I think I am the one that is learning all the lessons here... I think my mom was relieved when I took over doing my own hair.
This whole growing up/parenting business is never easy is it? But when I see how proud she is when she's all done and accomplished something that she's been practicing, it makes me happy, and I can let her go feeling the more important step has been taken. Because isn't that why we do this ladies? To help our little darlings feel good and have confidence in themselves? It's not about vanity, it's about helping them have the inner strength to go out and face the world and people around them. I know it's easier for me to do that with my face ON rather than washed off, and my hair done, rather than clipped back in twelve little clips. (Generally it helps for me to have my contacts in as well.)
So all I'm trying to say is that I hope you are having those wonderful growing moments together too when you are with your gals to get them ready for the day, whether you are allowed to do their hair or not! Happy Mothering!
And enough with my waxing philisophical, here's a fast, easy, and basic little hairdo with braids, that I, of course, saw somewhere else and thought it was fun and different.

Start with a center part, hair dampened and gel in if you prefer to help with flyaways.

Each side will be divided into 3 sections, from front to back. Part off the first section and braid it to the ends.

Part off your next section, and make the two outside sections larger, since you'll be incorporating your braid as part of the next braided section.

Showing the 3 sections.

Continue the braid to the ends.

Do the same with the last section.

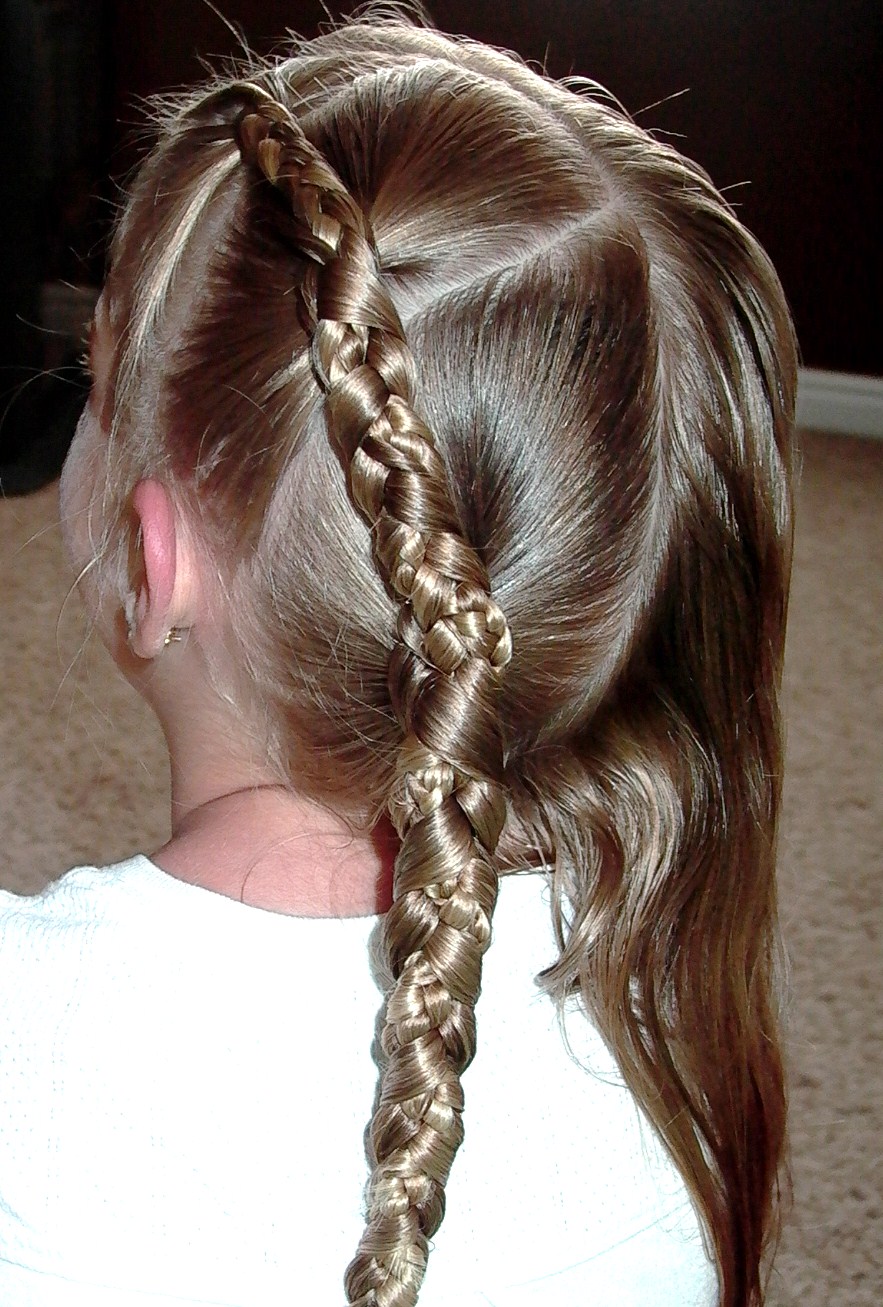
And finish on the other side. Do any of you get the 'warped' braid look when you braid in other braids? You can see how hers aren't hanging straight down in this pic. Some things you can do, that work somewhat......1: You can get your hand wet and run it down the braid, pulling down and trying to work out the 'kinks'. 2: You can hang a big fat heavy flower or ribbon on it (it would have to be pretty heavy, so of course I'm joking. 3: you can join the two braids together in the back and put them into one braid. I simply just called it good and said, "off ya go!" :)


Enjoy those little girls! There is just something special about them, and they grow up too darn fast!

Friday 3 September 2010
How to do girl's hairstyles: Your Back to School Pics!
I want to say a HUGE THANK YOU to everyone that has sent me pictures of their darlings hair so far! I got a bunch in my email, and even more on my Facebook page, so be sure to head over there and take a peek at some of those new and so creative hairdos. It never fails to amaze me the 1001 things we can come up with to do to all that hair! I think that's why it's so darn much fun!
Here's just a sampling of some of the super amazing hairdos I received for the first day of school/preschool!


Here's just a sampling of some of the super amazing hairdos I received for the first day of school/preschool!


Thanks again! Keep them coming and I'll post them!

Subscribe to:
Posts (Atom)