Monday, 18 April 2011

Little Girl's Hairstyles: Easy Twist Around Braided Ponytail 10-15 min

Well, here's a funny thing: I could have sworn I'd already posted this hairdo! Am I crazy? Does this look familiar to any of you? I searched and searched, and could not find it anywhere! If anyone of you find it elsewhere, please let me know! If not, then here's a new one for you! I was going to use this as one of my 'Blast from the Past' hairdos, since I happened upon the pictures and was reminded of how much I liked this hairstyle, but ........a new hairstyle is great too!

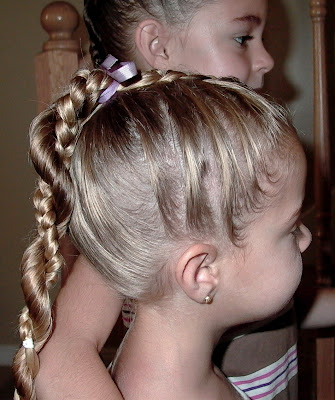
Twist Around Braided Ponytail

 This side view shows off the back ponytail nicely. I started this cute little hairdo with a french braid in front, drawing in hair, just to the ears. I then finished the braid all the way down to the ends.  I then gathered the rest of the hair (nice and damp of course) up to where I finished the actual french braid, and put it, along with the braid, into a high ponytail.

 I then just twisted the remainder of her loose hair and wrapped it around the braid, and secured the ends with an elastic. Keeping the hair damp, especially in the twist, will help keep the hairdo in longer and looking more finished. Spray both sides of the finished braid well with hairspray, and she's done!
 Those cute bows and smiles finish it off nicely!


Thursday, 14 April 2011

Little Girl's Hairstyles: Video Tutorial: How to use soft foam (or sponge) curlers

Hi ladies! I am setting this post up pre-baby, so hopefully it will come through on time, and won't have any problems.
Using the soft or sponge/foam curlers in my girls' hair is pretty routine in our household, especially when we know we'll be having some major hair-doing event in the morning, and I know I"ll be trying to prepare 3 heads of hair. We use these for church hairdos and lately, for my oldest's dance competition hairdo's. Here's a few examples of the cute bouncy curls you get from using these great soft curlers:

Just after taking out the soft curlers:
 Finished hairdo:
 A curly bun with all the curls pulled up on top in a high ponytail: (I'll be posting how to do this hairstyle later on).
These are great to use for those Easter Sunday hairdos!! Try them out with the off centered braids and twists I've been sharing lately. Just roll her hair the night before, then do the braids/twists then next morning. ***Just remember***don't roll WET hair, unless you plan on spending a fair amount of time blow drying the curlers while in her hair. I always blow dry their hair after their baths, then put in the soft curlers. Adding a little gel before blow drying also helps add shine and helps control frizz.


Have a great weekend!!


Monday, 11 April 2011

Little Girl's Hairstyles: Off centered braid and twist hairstyle no. 3: 15-20 min

My last example (for a while) of the off-centered braid and twist. This is the basic beginning that I shared in my first post in this series. (Check out my last two posts).

I begin with the french braid, and the twist on the side, and join them in the back. I used my waver again on the rest of her hair. You could also do some flat iron waves, or corkscrew curls, or just flat iron it straight as well.
This is another cute one for Easter, and gives you great hair to show off some of those great big flowers or bows that match their dresses.


 This is it friends......for on Wednesday (at the latest) I'm going in to have my baby girl! I have some posts with videos planned however, until I can get back to doing hair and hopefully being normal again! Have a great week and wish me luck!


Thursday, 7 April 2011

Little Girl's Hairstyles: Off-centered french twist braids 15-20 min

Got any big plans for spring break? Ours is coming next week, and it will just be baby land in our house. My girls are so excited to be little mommy's helpers and take care of their baby sister they are about ready to burst. It is so thrilling for me to see their anticipation. :)

Here's the second hairstyle I promised using the off-centered braid and twist idea that I shared in my last post.
Off centered french twist braids:
 I split the larger parted off section into two equal parts, and instead of doing a french braid, I did a french twist braid (see my video on how to do french twist braids). I crossed the top twist over the second when bringing it back to the center (or off center) of her head.  I did the same regular twist on the smaller side, like in the previous post, and joined them together.
 I used my waver to finish off the rest of her hair and added a big bow.  She's all ready for preschool!
 A pretty and fun Easter hairdo to keep in mind!


Monday, 4 April 2011

Little Girl's Hairstyles: Off centered braid and twist hairstyle 15-20 min

Happy April! This is my favorite time of year! All my bulbs are coming up (along with the weeds), but I just love watching everything start to blossom and turn green again, rather than the drab brown patches I've been looking at all winter! So in preparation for the Easter holiday, here's a little 'series' I'll be sharing in the next few posts:

This is a 'progressive' hairstyle, I like to call it, because I use the first part of this hairstyle, with the off-centered french braid and twist in a few different hairstyles--which I build on, to give you more ideas and variety.  This hairstyle has a french braid, a twist, a twist braid, a stacked pony, and a regular braided ponytail-but it's still easy and basic! Like most of my 'basic' components, I have videos on how to do them. Feel free to check those out for the french braid and the twist braid if needs be in the Video Tutorial section.

 To begin, I started with, of course!, DAMP hair. This is pretty much the case with about 99% of my hairdos. I give her a center part, back to the ear line.
 I then part down to her ear on the larger side. This is where I will be doing the french braid.
 I french braid back to the part, and then continue with a regular braid, just far enough to reach a little past the center of her head in the back.

 Then on to the smaller parted section.
 Comb neatly and begin twisting towards the center of her head.
 Join them off-centered like so, with an elastic.This is my stopping point for the other hairstyles I'll be showing you soon.
 From this point, I do a twist braid down to the ends of her hair
 And then secure the rest of the hair into a low ponytail.
 I pull the ponytail over the top of the joined braid and twist,
 and make a stacked pony and wrap the twist braid around base of the ponytail. I use a clear elastic to secure the twist braid in place. I then braid the ponytail down to the ends. If your daughter's hair isn't long enough to do the twist braid, just wrap it around the ponytail base.


 You'll need to plan a few extra minutes if you want to do all the twists and braids, but it's a fun one to do! I really like the off-centered look of the ponytail when she's all done.